
Utilizing RingCentral/ACO Call Queues to Route to Xima CCaaS
This article provides information on how to utilize RingCentral call queues to dynamically route to Xima CCaaS.
Overview
Using RingCentral’s PubNub API for presence status, we don’t natively get all of the unique routing identifiers we need to route calls to Xima CCaaS.
Because of this, if you require routing based on DID, Queue Name, etc., then you will need to front-end each of these contact center Skills with a RingCentral Call Queue.
The following article will go over these details with step-by-step instructions.
Platform Steps
Create New Call Queue
- Navigate to the ACO/RCO Admin Portal

- Go to Phone System > Groups > Call Queues and click the +New Call Queue button
- Select the Site that the Xima Load Balancer was created on
- Create a "Group Name", which will act as the Skill Routing Identifier (also known as a Tag) for routing calls to Xima CCaaS
- In the example above we used CC Support
- The Extension Number will be auto-assigned but can be changed to an available Extension
- Select "Next"
- Enter a "Voicemail PIN", even though we will not be utilizing it
- Select a Manager by name below for who will be managing this voicemail box, incase a voicemail ends up in this box
- Select the Xima Load Balancer, from above, as the Manager Extension
- Select "Next"
- On the "Select Members" screen select the Xima Load Balancer as the only member of the Call Queue
- Select "Done"
- NOTE: If you are unsure what your Xima Load Balancer or Primary Handset is, open up the SIP Extension configuration within Xima CCaaS and note the extension on top of the list
- It will be in bold, like in the image below
- In this screenshot example it is extension 101, but this will vary based on how it has been configured

Verify Call Queue's Configuration
Call Handling & Members Menu
- Once the Call Queue has been created, please select it from the list and go over its configuration
- Open the "Call Handling & Members" dropdown and verify the following under the "Work hours" tab:
- "Route calls to members" should be set to Simultaneous
- "Maximum concurrent calls per agent" should be set to 5 and uncheck "Include direct calls when calculating maximum calls"
- “After call wrap-up time” should be set to 0 Seconds
- Under "Primary Members" please add the Xima Load Balancer only
- In our example below, the Xima Load Balancer is extension 500, which is our primary handset and is named “Xima CCaaS LB”
- The name and extension will vary based on your configuration
- Open the "Call Handling & Members" dropdown and verify the following under the "Work hours" tab:

2. Verify the following under the "Wait Settings" tab:
    1. Set the "Number of callers allowed in queue" to the highest number, most likely 25 callers
        1. This number should not apply to Xima CCaaS because Xima CCaaS has unlimited queue amount and duration, but you can set the caller number to the highest number as a precaution
    2. Set the "Maximum caller wait time in queue" to the highest number, most likely 15 minutes
    3. Click Save
3. Please verify these settings for all of the queues you’re using to route to Xima CCaaS
Greeting & Hold Music Menu
- Click on the Greeting & Hold Music menu
- We recommend disabling the Call Queue Greeting, Audio While Connecting, and the Hold Music as this music will play back to back with the Xima CCaaS music that is provided
- Click Save

Select Routing Options
- The next steps depend on how you want to route these calls to the Contact Center
- A common example would be to route based on DID
- NOTE: DIDs are referred to as “Phone Numbers” within RingCentral
DID Routing
- Open up your Call Queue, select the Direct Numbers drop-down menu, and click +Add Direct Number
- Input your DID information
- Please be sure that you have a DID associated with your RingCentral queue, as this will serve as your Skill Routing Identifier
- Navigate to the Call Handling & Members > Display Settings menu
- For the Call information displayed setting, select either Queue Name or Phone Number as your first option
- In the example from earlier, using Queue Name would send "CC Support" as our Skill Routing Identifier
- Selecting Phone Number would use the actual DID/Phone Number as the Skill Routing Identifier
- Leave the second option as CallerID Name

Alternative Routing Methods
- Within your Call Queue, navigate to Call Handling & Members > Display Settings
- NOTE: There are two fields to pick from, both with the same options

- If you would like to route based upon the “Queue Name,” “Queue Extension,” “Caller ID Number,” etc., you can certainly do so as long as you match the syntax in Xima CCaaS to the correct Skill Routing Identifier

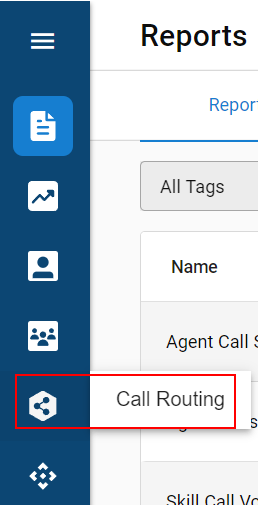
Xima CCaaS Web Portal Steps
-
Open the web portal for your instance of Xima CCaaS
-
Navigate to Call Routing
-
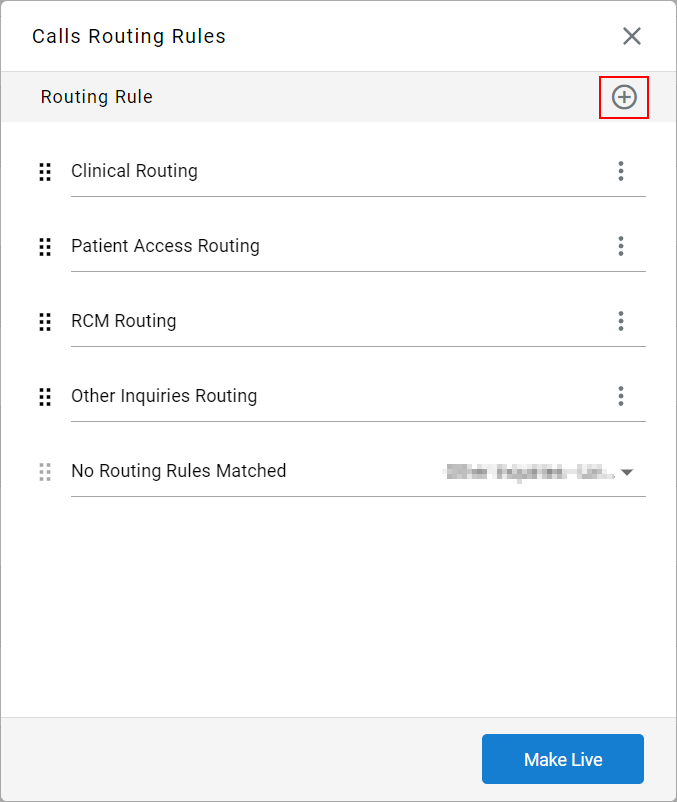
Within the new menu, select the + symbol to create a new Call Routing Rule
-
Configure the following within the new menu:
-
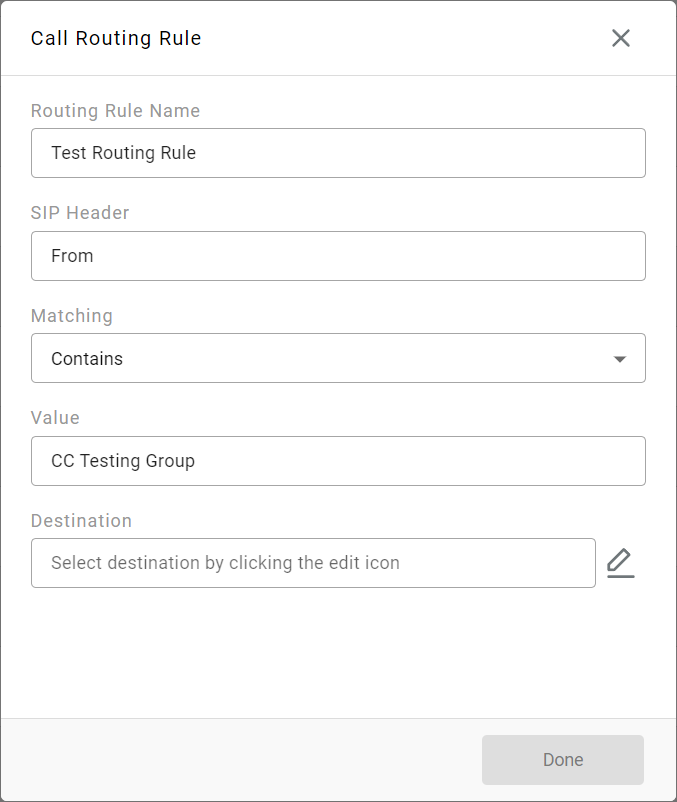
Routing Rule Name
- This name can be anything and is meant to help you quickly edit your rules later
-
SIP Header
- Within RingCentral/ACO, this is most commonly From
- You can select anything from the dropdown menu, and even put in your own custom header
-
Matching
- Recommend using Contains in order to best match the platform's naming
-
Value
- The Queue Name that was created in the steps above
-
Destination
-
Select the Xima CCaaS Skill that you would like to send the calls to
-
-
-
Select Done
-
Once all Call Routing Rules are configured, select Make Live
What if a call comes in and no rules are matched?
There are certain circumstances where none of your Call Routing Rules will match a call's SIP Headers. You can set up a “Default” skill group to have these calls routed to it. By default, this is set to “No Skill” so you will need to manually set this up upon initial setup.
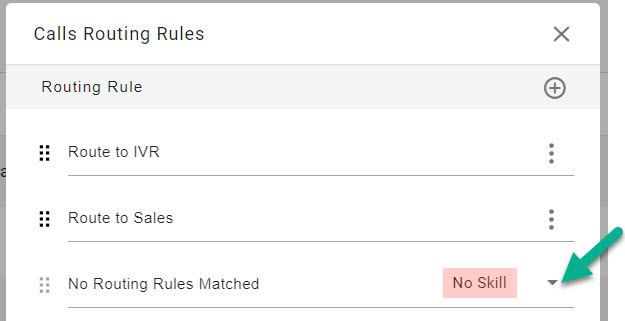
If no rules match and your default isn't set up your calls will come into the Contact Center and immediately be disconnected. (The system doesn’t know where to send them)
Xima CCaaS Desktop Steps (Deprecated)
Once done configuring your Call Queue, please log in to the Xima CCaaS Admin Portal to enter the created Skill Routing Identifiers
- On the main page, using the left-hand column, go to Contact Center Configuration > Skill Management

- Find the Skill that you wish to route to from our created RingCentral Call Queue, and click the three dots above the name to open it

- Once the Skill is opened, find the field for “Skill Routing Identifier”
- Open this up by clicking the ellipsis button, and then click the “Add” button
- Within this section, you will enter the Skill Routing Identifier that you selected as your first option under Display Settings on the RingCentral configuration
- In this example, we opted for the Queue Name as our first option, with the Queue Name being "CC Support"
- Once saved, send a test call through your system to verify your configuration


Video Steps
Final Notes
Whatever information you wish to send to Xima CCaaS as the unique ID/Skill Routing Identifier/Tag needs to be reflected on the FIRST of the two fields you can select from within RingCentral's Call Queue. Xima CCaaS is designed to utilize the first drop-down of the two to tag and identify the route where the call is going.
Also, these settings provide any user on RingCentral the ability to route a standard office call to a specific Skill in Xima CCaaS by simply dialing the corresponding RingCentral Call Queue extension.
Updated 15 days ago