Netsapiens Configuration
This article demonstrates how to configure Netsapiens.
Article #: 25
How To: Configure Netsapiens
Similar questions: Configure Netsapiens, set up Netsapiens, configure Netsapiens with Xima CCaaS, set up Netsapiens with Xima CCaaS
Purpose: Demonstrate how to configure Netsapiens
Steps
Platform Admin Portal Steps
Create an API user within the Admin Portal of your platform
- NOTE: This API user will serve as both the API user and as the extension with which we will receive calls from the Contact Center
- Log in to the Admin portal
- NOTE: While the URL will vary depending upon your instance, it will follow this same format: https://{FQDN}/SiPbx/adminlogin.php
- Go to Users > Configuration and click the Add User button near the bottom of the screen
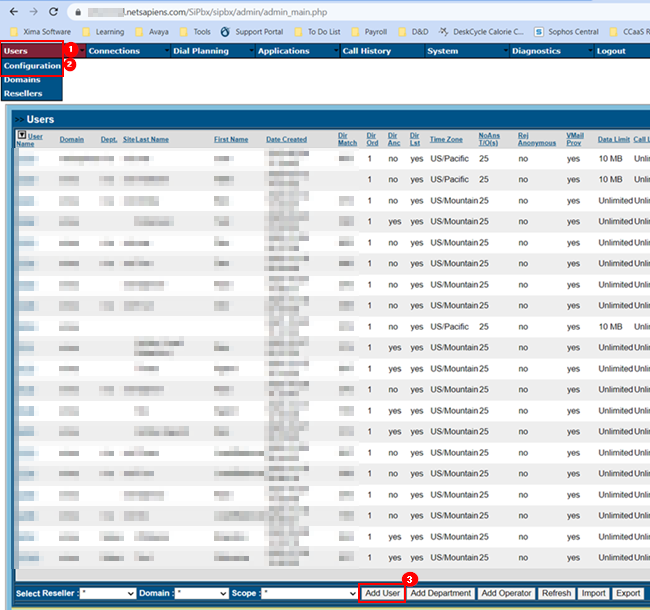
- Click on your assigned Domain
- Fill out the fields listed
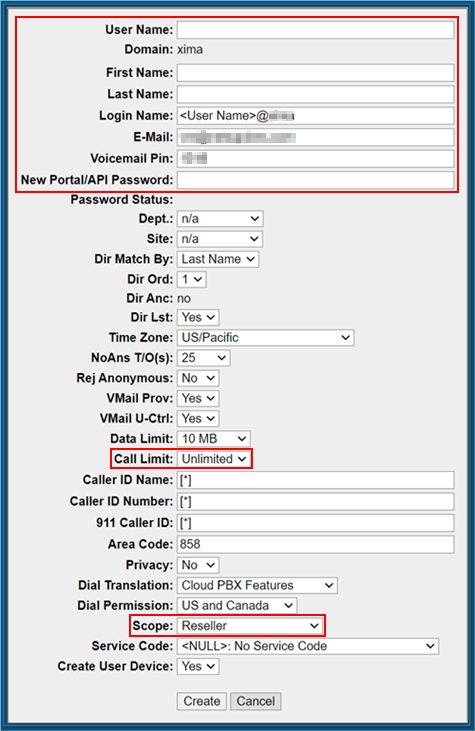
- Here are a few tips when filling out the fields:
- When creating a password, make sure it is strong and secure
- Notice that the Call Limit is set to Unlimited by default
- This is the recommended setting, though you can change it if necessary
- Notice that the Call Limit is set to Unlimited by default
- It is important to know that in order to pull UC API information across, we need to have at least a Scope level of Reseller permission or higher
- When creating a password, make sure it is strong and secure
- Click Create
- Click Create User Device
Creating the Oauth Client ID and Client Secret within the Admin Portal of your platform
- Go to System > Settings > Advanced > Oauth Clients
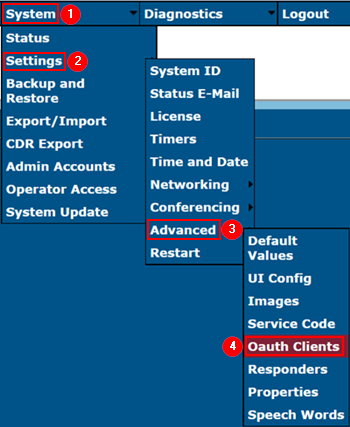
- Click the Add button at the bottom left
- Type in a Client ID name of your choice and click the Create button
- Click the Client ID name you just created and you’ll see that the Client Secret is listed a few lines down
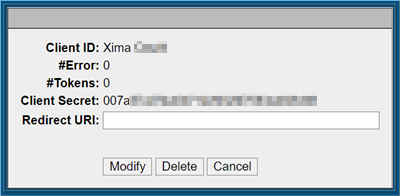
- Save both the Client ID and Client Secret for future steps below
Xima CCaaS Portal Steps
- Log in to the Xima CCaaS portal
- To do this, navigate to Xima CCaaS with the URL that has been provided to you (E.g. example.xima.cloud)
- At the login screen, enter your Username and Password and hit Login
- NOTE: The first time you log in you may see an error message that appears at the bottom of the screen
- This error simply means that Xima CCaaS is not connected to your platform yet. This is fine and is to be expected.
- NOTE: The first time you log in you may see an error message that appears at the bottom of the screen
Manage Platform Configuration within Xima CCaaS Portal
- Along the left-hand side of the navigation pane, select Admin (System) (cogwheel icon) > Target Platform Configuration
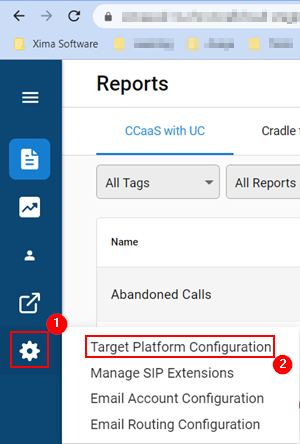
- A new window called “Netsapiens Platform Settings” will appear with information to fill out
- To get that information, please sign into your platform's Manager Portal
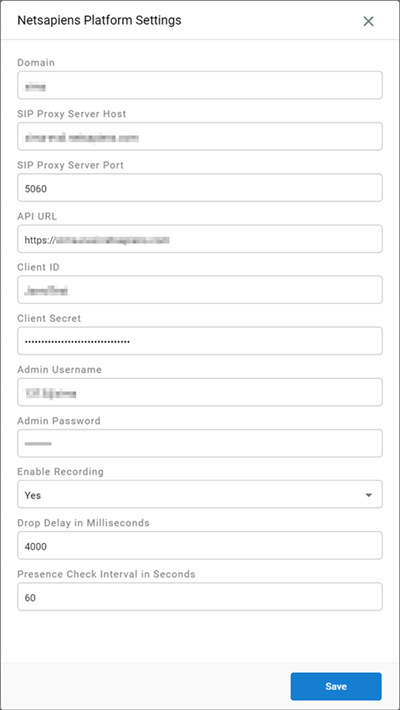
- After signing into your platform's Manager Portal, go to Domains > {Assigned Domain} > Users
- Search for your extension and select the Edit icon associated with your User
- NOTE: This is the API user that you created within the Admin portal
- A drop-down menu will appear, click on Phones
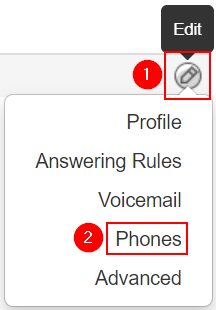
- A window called “Edit Phone” will appear, and here you’ll be able to see a lot of the information you need to fill out the "Netsapiens Platform Settings" window in Xima CCaaS
- If you do not see a phone, please click the "Add Phone" button
- Within the "Edit Phone" window you will see the Domain/Proxy and Outbound Proxy
- NOTE: Please keep the "Edit Phone" window open during the rest of this process for ease of information access
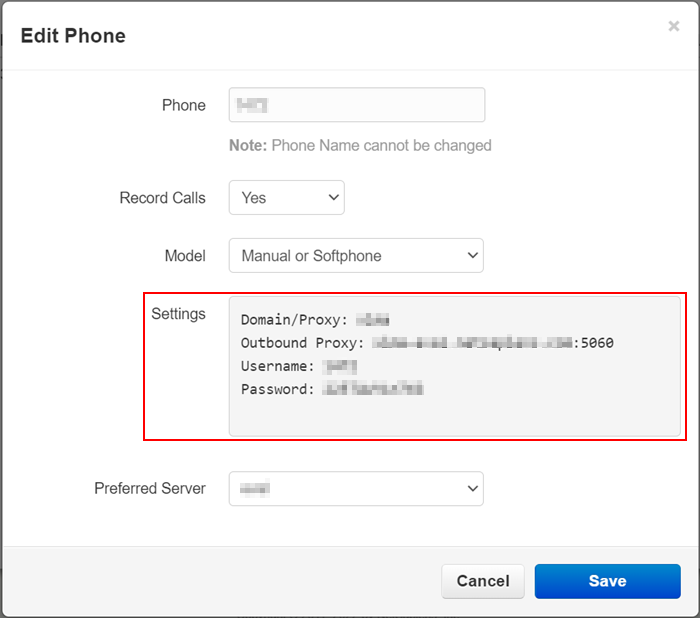
- Enter this information into your "Netsapiens Platform Settings" window within CCaaS
- When copying and pasting the Outbound Proxy, do not include the SIP Proxy Server Port portion
- The SIP Proxy Server Port will most likely be :5060
- When copying and pasting the Outbound Proxy, do not include the SIP Proxy Server Port portion
- Next, fill out the API URL in the "Netsapiens Platform Settings" window
- This information is in the URL of the Netsapiens Manager Portal
- Copy the first part of the URL (copy up until the .com/), and paste this information into the API URL field in your "Netsapiens Platform Settings" window
- This information is in the URL of the Netsapiens Manager Portal
- While still in the "Netsapiens Platform Settings" window, type in the Admin Username and Admin Password
- This is the username and password of the API user you created within Netsapiens above
- The last fields of information to fill out on the "Netsapiens Platform Settings" window are the Client ID and the Client Secret
- You should have this information from the steps above
- A new window called “Confirm Changes” will appear, click the OK button
Manage SIP Extensions within Xima CCaaS Portal
- While still in Xima CCaaS, go to Admin (System) > Manage SIP Extensions
- A new window called “SIP Extensions” will appear
- Click the + icon located in the upper right-hand corner of the window
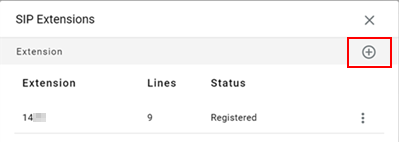
- A new window called “Add Extension” will appear
- Here you will need to enter the SIP Extension and the SIP Password
- To get this information, go back to the Netsapiens Manager Portal that we instructed you to keep the “Edit Phones” window open
- This is because the SIP Extension and SIP Password information are listed in that window
- The SIP Extension is the Username and the SIP Password is the Password
- NOTE: Please still keep the “Edit Phones” window open
- To get this information, go back to the Netsapiens Manager Portal that we instructed you to keep the “Edit Phones” window open
- Go back to the "Add Extension" window in Xima CCaaS and copy and paste the corresponding information
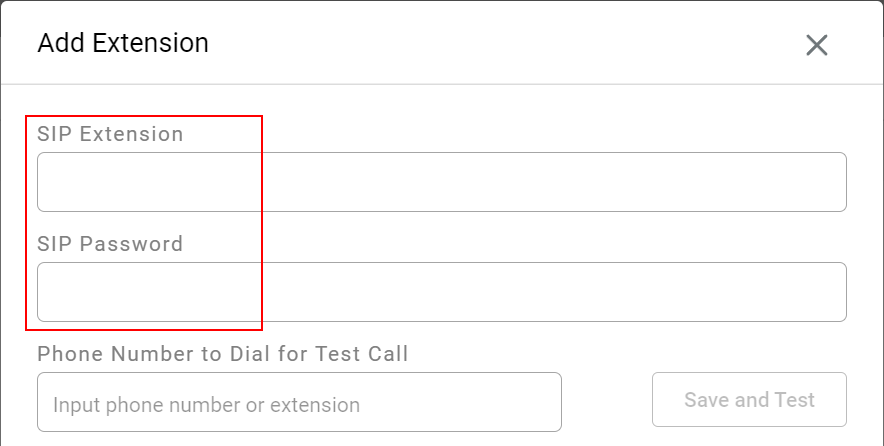
- Click Save
- A new window called “Confirm Changes” will appear and click the OK button
- Click Done when your extension has been registered
- Within the "Xima CCaaS Portal" click on the person icon on the left and click "Refresh Users and Groups"
- Re-log into the "Xima CCaaS Portal", click on the person icon on the left and click "Agent Licensing"
- Here you will see all of the agents that were pulled over from the platform
- Go back to the Netsapiens Manager Portal where we've kept the “Edit Phones” window, and finally click Save
- Click Inventory and you’ll be able to see many different DIDs, listed under Phone Numbers
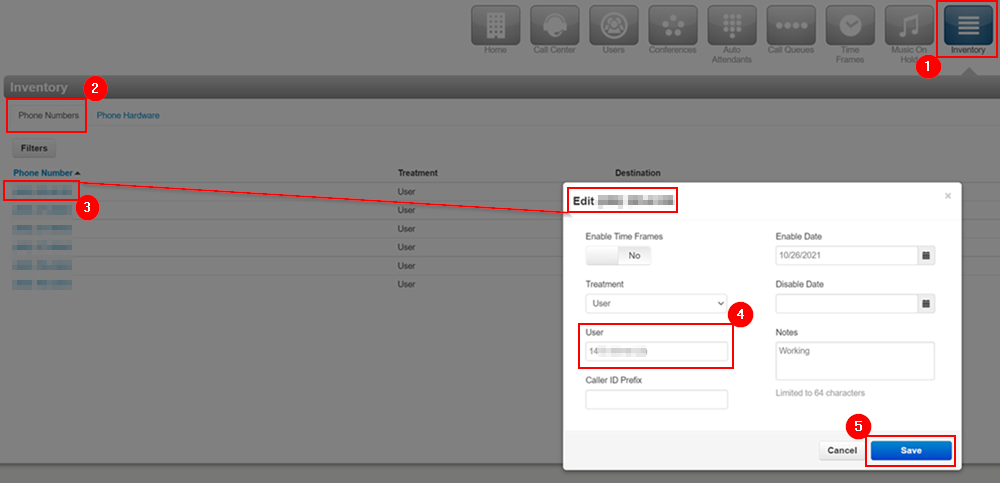
- Select the appropriate DID and go to the User field
- Type in your API user's extension and click Save
Video Steps
Updated 3 months ago
