
Realtime Metrics API
After creating a Service User within CCaaS, you will be given an authentication key. Anytime a request is made to the API, an authentication key must be present. Add the following header to your API request: Authorization : Bearer {authentication_key}. By having the authorization key present, you will be able to access everything that the Service User is set up in CCaaS to have access to.
Use Cases
- Show Realtime metrics on a 3rd party dashboard with a periodic refresh
- Monitor Realtime metrics with a periodic refresh within a 3rd party web service
- Periodically refresh and show metrics like “Current Wait Time” and “Calls in Queue” on a customer’s website
Creating a Realtime Metric
In order to poll a metric value, we’ll need to first create it for API use. To do so, navigate to the CCaaS main page. On the left sidebar, select API Enablement > Realtime Metric Access. If no Realtime metrics exist, then a pop-up window will appear called "API Enabled Realtime Metric." Click "Show List View," which is located in the bottom left corner. This will allow us to see all of the reports that are currently enabled for API use. (If Realtime metrics do not exist, then you will instead open up to a pop-up called “Realtime Metric API Profiles.” Clicking “Add” in the top right corner will allow you to create a new metric value.)
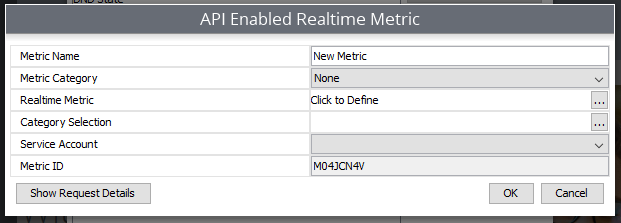
- Metric Name: The title of the metric. This is what’s displayed in the list view of all of the created Realtime metrics.
- Metric Category: Select the category of the desired metric(s). For example, are you looking at agent values or group values?
- Realtime Metric: Select which Realtime value you’d like to get results for.
- Category Selection: Choose which agents, roles, skills etc. to obtain values for based on the metric category selection. E.g., when we select “Agent” for the metric category, then the category selection will allow us to select which agents we want to obtain Realtime values for.
- Service Account: Select which service user has access to this metric. Note: you'll need to use this service user's token in the GET request
- Metric ID: The ID associated with the metric. This is used in our API requests.
Once the information has been entered, click "OK." You should be redirected to the list view below. If not, then click API Enablement > Realtime Metric Access from the CCaaS main menu and click “Show List View.”

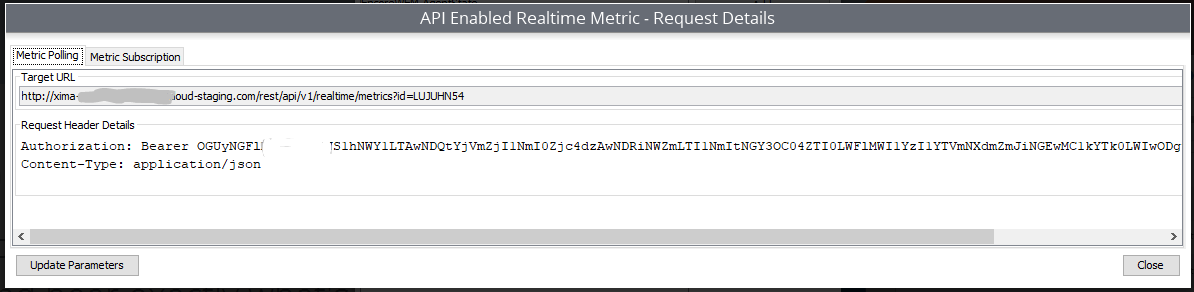
Once you've added metrics, click the "Show Request Details" button, which is located near the top right corner of the window. You’ll then be prompted to select your service user and metrics.

Select the Realtime metric(s) you want and click "OK."
A new window will appear that provides you will all the necessary information. It’s also important to note that this window has two tabs. The “Metric Polling” tab will give you a list of API-enabled metric values. The “Metric Subscription” tab will give you Realtime data over a websocket connection.
Potential Errors
| Status Code | Failure |
|---|---|
206 Partial Content | Not all of the requested metrics are initialized. The metric values available will be returned in “results.” The metric values that are not available will begin initializing, and their IDs will be in the “initializing” list. Try back in a few moments to get the values that are initialized. |
401 Unauthorized | The authorization header wasn’t valid. |
403 Forbidden | The requested metrics are not assigned to the authenticated user. |
404 Not Found | The requested metrics do not exist. |