
Time of Day Condition
Time of Day is a conditional step that can be added to any IVR. The purpose is to use a predefined schedule of days and times to determine how an inbound call to that IVR should be handled whether inside or outside of your hours of operation.
Building a New Time of Day Profile
A Time of Day Profile must be first built before it can be applied to an IVR condition.
To learn how to build a Time of Day Profile, review this article.
Adding a Time of Day Condition to an IVR
-
While configuring a new IVR Call Flow (or editing an existing one), select the "+" box to add a new condition/action

-
Select "Time of Day" from the dropdown list
-
In the "Time of Day Check" menu, fill out all fields
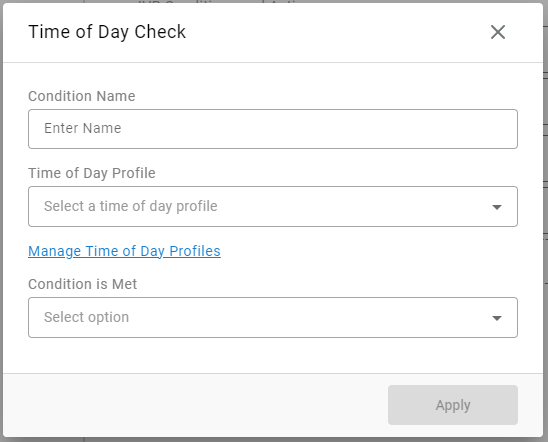
- Condition Name - What will this conditional step be displayed as in the flow and in historical reporting. As an example, you may call it "After Support Hours"
- Time of Day Profile - Select which Time of Day profiles should be utilized from the existing list of all profiles.
- Manage Time of Day Profile - If you need to build a new profile or edit an existing profile, you may select this text to enter the profile management menu as outlined in the section above
- Condition is Met - Allows you to choose if the condition should be considered to be met/true if a call comes in "Outside of Profile Hours" or "Inside of Profile Hours". As an example, if you used "outside of Profile Hours" and used the default 8a-5p times, any call that came in outside of those hours would follow any sub-actions assigned to the profile.
-
Select Apply when done.
Assigning Sub-Actions to the Time of Day Condition
Once a Time of Day condition has been added to an IVR flow, you may first decide where you'd like the condition in the order of existing steps. Best practice would be near the top.
Next, as you hover over the bottom of the Time of Day condition box, you'll see a slightly shorter "+" box appear beneath the condition. Here is where you'd assign sub-actions that should take place when the condition is met.

Updated 4 months ago