Setting Up Xima CCaaS Overflows
This article provides information on how to set up Xima CCaaS overflow events in RingCentral/ACO in case of oversaturation.
Because of the limitation on RingCentral/ACO that allows for only 4 simultaneous calls per UC extension, there are a few ways within Xima CCaaS to set up overflow events in case of oversaturation.
Option One - Max Calls Allowed in Queue (Set within each Skill)
- Open the Desktop Client, or Java UI under
- Navigate to Contact Center Configuration > Skill Management
- Find the Skill that you wish to create the overflow within and click the ellipsis button above it
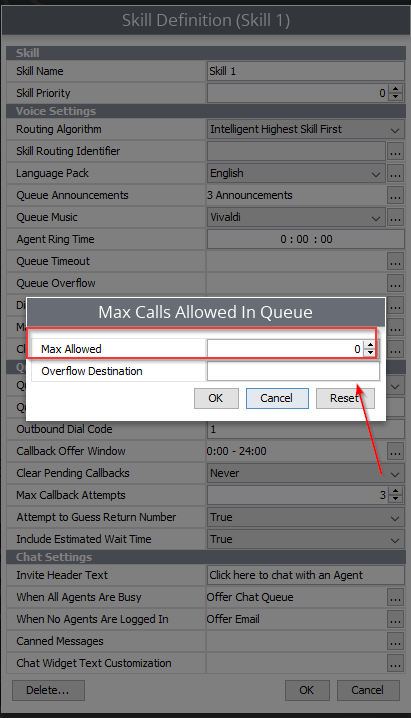
- Find the “Max Calls Allowed in Queue” setting
- In the event that this skill has reached the specified amount of calls within it, it rolls over to the specified phone number of your choice
- Note again that this is based 100% upon this skill group specifically
- If you have more than one skill group available, you still have to take into account the limitation of the total amount of calls collectively allowed across all groups
- This is based on the number of UC extensions you have configured within CCaaS itself.
- In the event that this skill has reached the specified amount of calls within it, it rolls over to the specified phone number of your choice

Option Two - SIP Capacity Overflow Destination (Xima CCaaS System Wide Setting)
- Open the Desktop Client, or Java UI under
- Navigate to Admin (System) > System Settings > Voice Seat
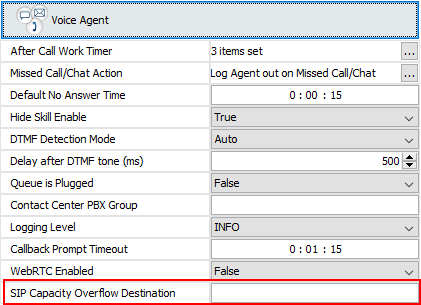
- Find the setting called “SIP Capacity Overflow Destination”
- This setting automatically takes into account the total number of calls allowed based on the number of handsets you have configured
- When it’s saturated to the point where no more calls can be received, it immediately overflows to the number specified in this field
- A common example may be a preconfigured RingCentral/ACO DID or an external number somewhere else

Updated 3 months ago
