
Microsoft Teams Direct Routing Configuration
These instructions provide a step by step guide on how to configure Xima CCaaS with Microsoft Teams via an SBC.
Info
Teams is Microsoft’s hub for teamwork in Office 365, bringing together chat, meetings, calling, and collaboration
all in one place and accessible on a wide range of devices. It enables users to communicate with voice and video
across geographies, languages, and organisations. Users can work in confidence on a platform designed with
advanced security, control, and compliance features.
NOTE: These steps may change as Microsoft updates its menus; please refer to their support team if you have any questions.
Pre-requisite Licensing
- Business Basic + Teams Phone standard
- Business Standard + Teams Phone standard
- Business Premium + Teams Phone standard
- Office 365 E1 + Teams Phone standard
- Office 365 E3 + Teams Phone standard
- Office 365 E5
- Microsoft 365 E1 + Teams Phone standard
- Microsoft 365 E3 + Teams Phone standard
- Microsoft 365 E5
Please ensure that you have the appropriate licenses before you proceed.
Steps to Configure Direct Routing Connector Licences
Register a subdomain name in the tenant
-
Navigate to the Teams Admin Center, https://admin.microsoft.com/Adminportal/, and verify the SBC Domain
- Working with Xima Software, you’ll receive an FQDN, which will be made within the Enablr platform for our use.
- There may be some variation with this FQDN, but in the example below, we will go with "customername.teams.channeluc.com”.
-
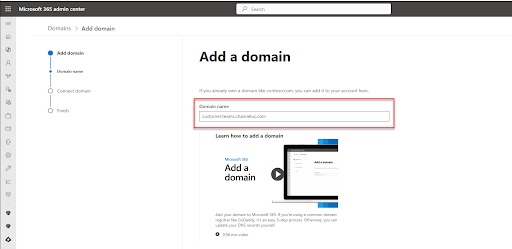
Navigate to Settings > Domains > Add Domain and enter the FQDN provided within the "Domain Name" box
-
Click “Use this Domain”.
-
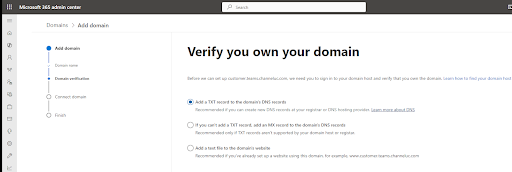
On the next page, select “Verify you own your domain”.
- Video documentation here
-
By default, the top option, “Add a TXT record to the domain’s DNS records”, is selected.
-
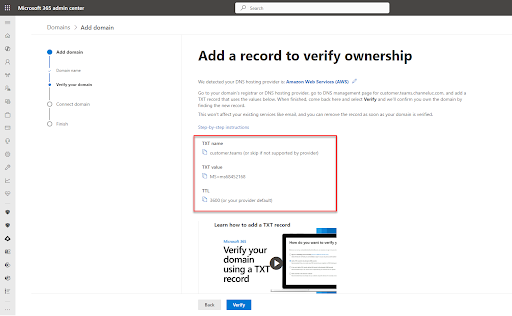
Click continue, and please note the three fields generated to verify the domain.
-
Please email the TXT value to [email protected], then wait for confirmation that the TXT value has been added.
- A4 will input this information into the SBC (the Enablr platform) on Xima's behalf.
- This will start the process of verifying the connection between the SBC and the Teams tenant.
-
Do NOT click “verify” until you’ve received word that this has been added. If you do, it will fail to be verified.
- The best practice is to halt your progress at this point until you’ve received word that it has been added.
- At which point, you can access this domain again and start where you’ve left off.
- The best practice is to halt your progress at this point until you’ve received word that it has been added.
-
Once everything above is done, continue to the next step.
Create a temporary User to register & activate a subdomain
-
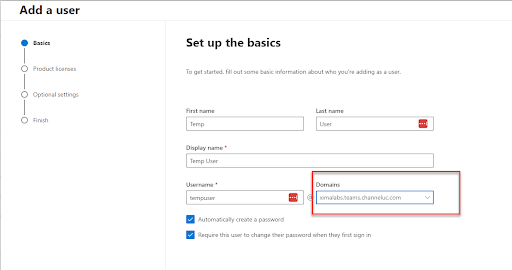
Navigate to Users> Active Users > Add a user
-
When finalizing this page, be sure to select the new domain that you’ve just set up.
- The user MUST contain this new domain.
-
Click "Next" and temporarily assign a paid license, then click “Next” again.
-
Enable “Admin Center Access” and “Global Administrator”, then click “Next”.
-
Finalize the user creation by clicking “Finish Adding,” which will take you to a confirmation screen
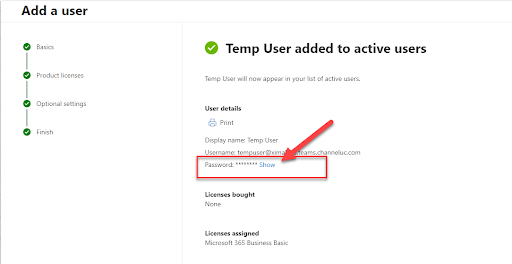
-
Make a note of this user’s email address and password before proceeding.
-
Open an incognito window and log in with this newly created user.
- Logging in as this user will help the system recognize and initiate this new subdomain.
-
Once this is done, you’ll be able to log back into the Teams Admin Center and add the FQDN as an SBC.
Connect the SBC to MS Teams
-
To pair Office 365 with Xima SBC infrastructure, access your Teams Admin Center with full
administrative rights.- NOTE: These next steps must take place after you’ve verified the subdomain and created a user within that domain
-
Navigate to the Voice Menu > Direct Routing.
-
Create a new SBC by pressing Add.
-
Enter the SBC FQDN name received by Xima, and add a description.
-
Upon creation, toggle ON the “Enabled” option and add the signaling port provided by Xima.
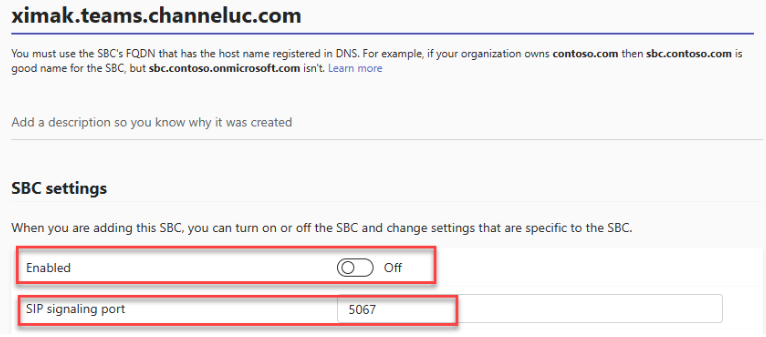
-
Leave the remaining settings as they are.
- NOTE: One exception may be if you wish to configure a failover and/or you have multiple SBCs.
-
Once applied, the settings will be visible under SBCs.
-
Should you want to review these settings after saving, they can be found under Voice > Direct Routing > Settings

-
-
Click “save” and note your newly created SBC
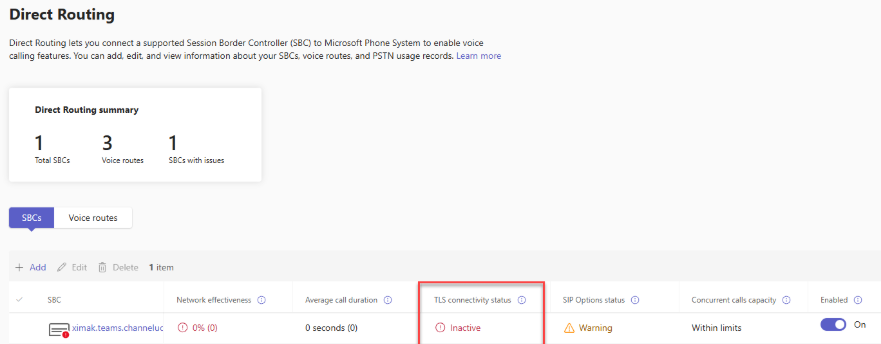
- You’ll also note that the TLS Connectivity Status says “Inactive”. This is normal and should not be a concern.
- Once traffic starts to come through, the “SIP Options Status” will change
- You’ll also note that the TLS Connectivity Status says “Inactive”. This is normal and should not be a concern.
Voice Routes
To make a call, a PSTN usage rule and a Voice route policy are required.
-
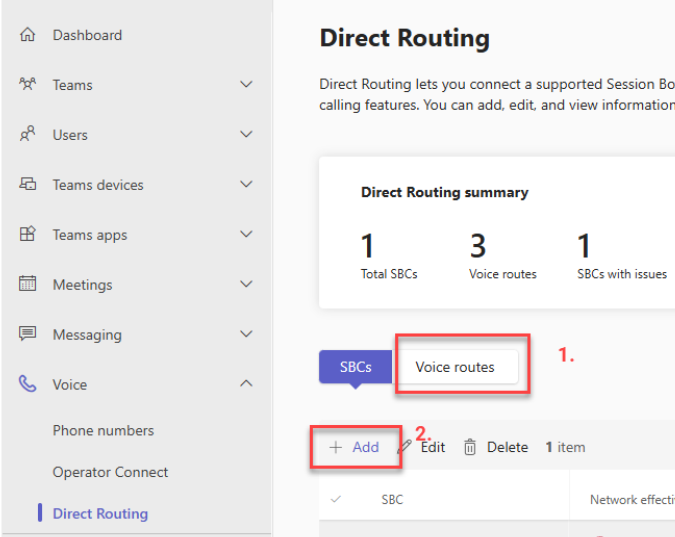
On the “Direct Routing” page, click on Voice Routes > +Add
-
Provide your Route with a name, perhaps something like “LocalRoute”, providing a description if you wish
-
Give it a priority, such as “1.”

- NOTE: “Priority” applies if you have multiple routes or SBCs. For example, local numbers vs. International numbers.
- In the example above, we have set up a simple routing rule of “.* “, which is a wildcard.
- This means that ALL traffic that comes into this routing rule will use this routing rule, even if there is another rule under it.
- Microsoft uses the priorities as they are listed, starting with 1. If it finds a match, it sends it.
- In the example above, since we’ve also set a lower priority rule for international, since the Priority 1 rule is a wildcard, all traffic on this SBC will use it and will not reach the international rule below it.
- If you have customers dialing internationally and locally, you’ll need to set up routing rules to accommodate both.
- We will make it “Priority 1” to resolve the issue in this example and match the international rule first.
- This means that any time a 0011 is dialed, it does a number match and goes out.
- If 0011 is NOT dialed, it then uses the wildcard rule.
- This can get complicated, especially with how dialing translation is expressed in routing tables like this.
- Another example may include multiple SBCs or phone systems. In that case, maybe we should set up some short codes for number matching.
- For instance, if .4000 is dialed, perhaps this goes out of our SBC and hits the Xima Contact Center.
- Whereas every other type of call goes to the wild card.
- Either way, make sure that anything that is NOT the wild card has a higher priority
- In the example above, we have set up a simple routing rule of “.* “, which is a wildcard.
- NOTE: “Priority” applies if you have multiple routes or SBCs. For example, local numbers vs. International numbers.
-
Under “Dialed Number Pattern”, to keep it simple, put in “.* “.
- This means that all traffic that comes through this SBC will be catered to this rule.
-
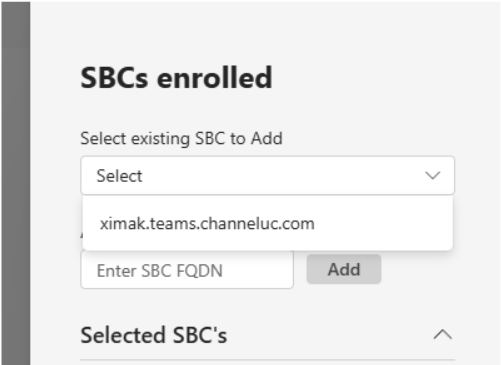
Under "SBCs enrolled", click on “Add SBCs”.
-
A window will pop up on the right-hand side that will show you the configured SBC.
-
-
Select it, and click “Apply” at the bottom.
Dial Plans
For utilizing short number calling through Xima, Teams service changes need to be applied to the Teams
DailPlan in Office 365
-
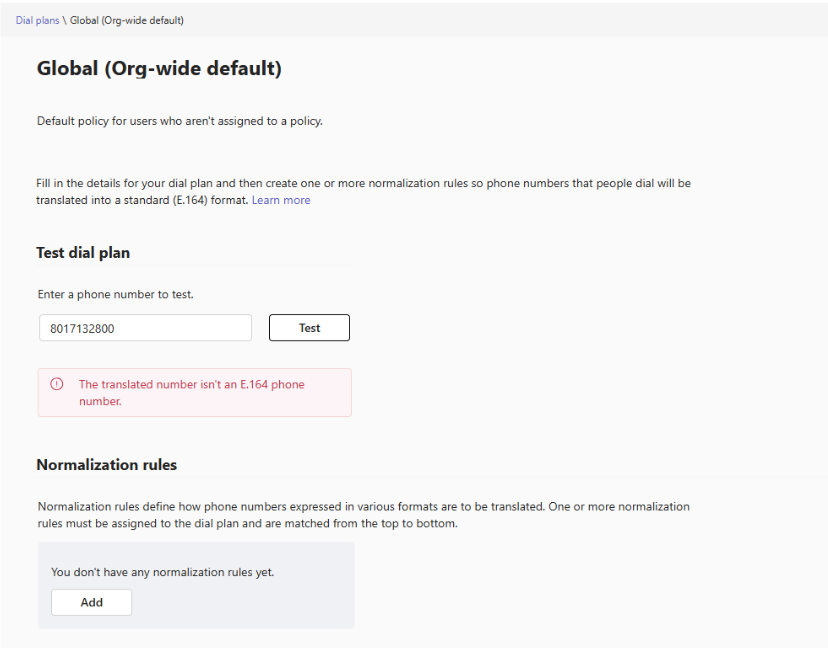
Access the Teams Admin Centre as an administrator and navigate to Voice > Dial plans > Manage Policies
-
If you have a “Global (Org-wide default)” policy, select it.
-
If there are no "Normalization rules" configured for it, click the +Add button
-
Enter the new Name of the rule
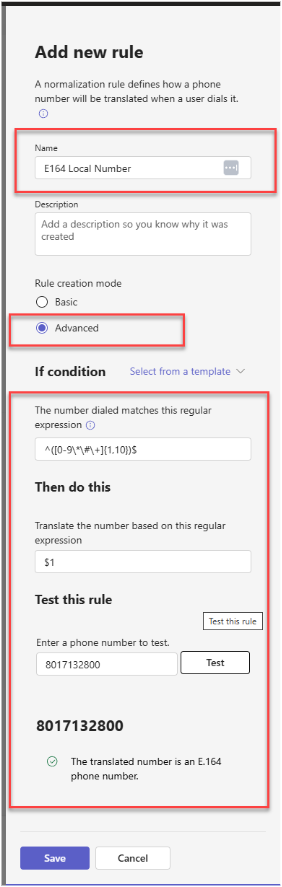
-
Select the Advanced radio button.
-
Configure the IF condition field.
-
In the "The number dialed matches this regular expression" section, enter the following:
- ^([0-9*#+]{1,10})$
-
Within the "Then do this" section, under the "Translate the number based..." section, enter the following:
- $1
-
You can then test the rule by entering a phone number and selecting Test
-
Lastly, click Save
This will complete the basic setup of Microsoft Teams direct routing
Updated 12 days ago