
Configuring Virtual Handset on Metaswitch
This article provides a step-by-step process on how to configure a virtual handset on Metaswitch.
How To: Configure Metaswitch
Similar questions: Configure Metaswitch, set up Metaswitch, configure Metaswitch with Xima CCaaS, set up Metaswitch with Xima CCaaS
Purpose: Demonstrate how to configure Metaswitch
Getting Started Info
Please be aware that you get the virtual handset extension information and password from your Metaswitch Provider. Also, note that this handset needs to have Voicemail Disabled.
Steps
Platform Admin Portal Steps
Create a UC Extension within the Admin Portal of your platform
You will first need to create a UC Extension (subscriber) within the MetaView Web Portal.
- NOTE: This is typically only accessible and available if you’re a reseller of Metaswitch.
- Navigate to the MetaView Web Portal
- Select the Business Group > Lines > Add Line

Add Line button
- Assign a license type to the new line
- This can be from a predefined template (that may or may not exist within the portal), or created manually
- For Xima CCaaS, the license type makes no difference as long as it allows for a SIP connection
- Add a phone number and subscriber name
- Example: “Xima Virtual Handset”
- Add the extension under the Extensions tab as displayed in the image below.

Add Extension buttons
Maximum Call Appearances
- Open the new Subscriber you've just created
- Under the Connection tab, adjust and verify the Maximum call appearances for your new extension that is acting as the Contact Center end-point
- Please set the “Maximum Call Appearances” to an amount that the customer will not exceed, and notate for later steps
- NOTE: This will be used within the Xima CCaaS Portal to dictate the "Total Channels Per Extension" setting

Maximum call appearances setting location
Configuration Menu Information
- Navigate to the Configuration tab of your new Subscriber
- Open the Advanced menu dropdown
- Make sure that "User notification of call diversion" is selected

User notification of call diversion setting location
- Notate the "Phone number" as this will be your "API Username" within Xima CCaaS
- Notate the "EAS Password" as this will be your "API Password" within Xima CCaaS

Phone Number and EAS Password setting location
Xima CCaaS Portal Steps
Target Platform Configuration
SIP Information
- Once you are done with the creation of that subscriber, log in to the Xima CCaaS portal
- To do this, navigate to Xima CCaaS with the URL that has been provided to you (E.g. example.xima.cloud)
- At the login screen, enter your Username and Password and hit Login
- NOTE: The first time you log in you may see an error message that appears at the bottom of the screen
- This error simply means that Xima CCaaS is not connected to your platform yet. This is fine and is to be expected.
- NOTE: The first time you log in you may see an error message that appears at the bottom of the screen
- Once you are logged into the interface, select the Settings option (gear icon) on the left
- Then select “Target Platform Configuration”
- Fill out all of the SIP information
- SIP Server Host and SIP Proxy Server Host
- SBC Address, which is the address your phones connect to
- SIP Proxy Server Port
- Typically 5060, but does have some variance
- Total Channels Per Extension
- The default is whatever the re-seller sets it up as, but you’ll need to change the line appearances to account for more simultaneous calls
- This information can be found under the Maximum Call Appearances
- SIP Server Host and SIP Proxy Server Host

SIP Platform Information
API Information
- Within this same menu, fill out the API information
- API URL
- This is the “CommPortal” Login
- The URL will be unique to the Re-seller as this points to their EAS Server
- API Version
- This is found within the PuTTY Login or within the “Community Network Dashboard” (Portal used to log tickets)
- It will need to match the version of Metaswitch to successfully complete the API request
- API Username
- This is the phone number of the Subscriber
- It is found under the Configuration tab, as notated in the Configuration Menu Information section above
- API Password
- This is the EAS Password
- It is found under the Configuration tab, as notated in the Configuration Menu Information section above
- NOTE: This is not the "SIP Password"
- API URL
- Click Save

API Information
Manage SIP Extensions
-
Once done with that, click the gear icon again and select “Manage SIP Extensions”
-
Click the “+” button on the top right-hand side to add your extension
- This is the UC extension you set up previously to be used as the Xima CCaaS “Virtual Handset”, the same extension as the Subscriber
-
Within this new menu, fill out the SIP Extension information
-
SIP Extension
- The extension of the user
-
SIP User
- Subscriber phone number
-
SIP Password
-
The password used to register a third-party phone
-
NOTE: Not the EAS Password, but can be found under the Connection tab as seen below
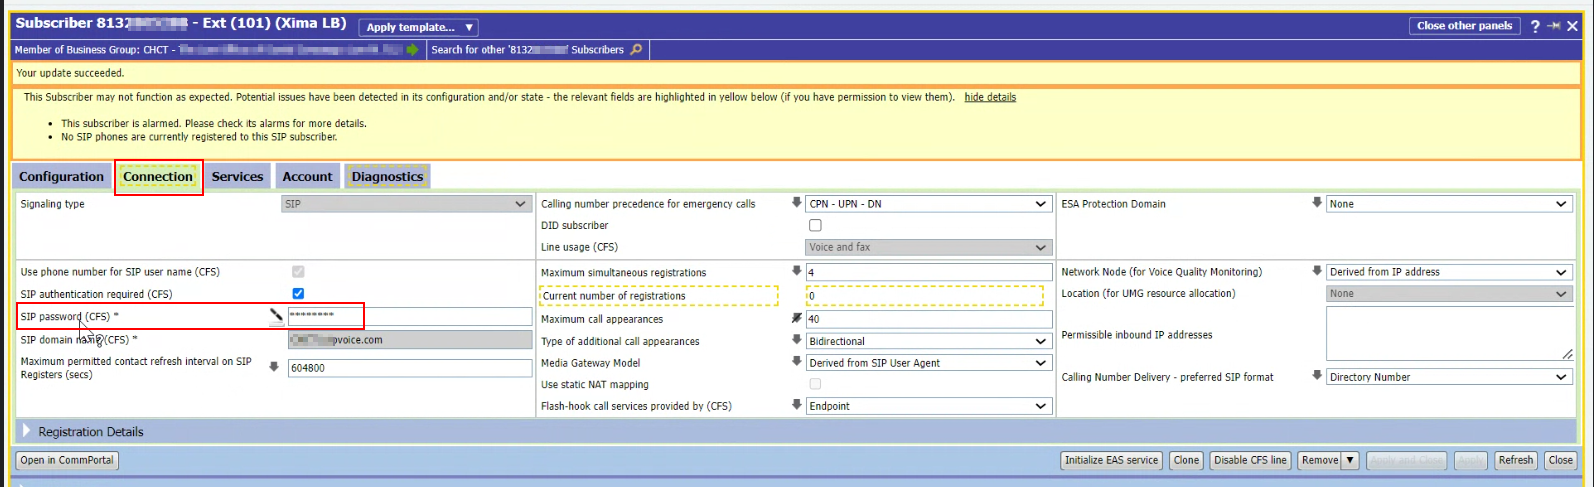
SIP Password Location
-
-
-
-
Click Save and Test
-
Once properly filled out, wait a couple of minutes and the extension should show up as “Registered” within the "Manage SIP Extension" menu

Edit Extension Menu
NOTE:If you have a single handset that is a part of 20 or more MLHG, your configuration will be slightly different and require that you create more handsets to handle Contact Center call traffic.
This is an example of a site that requires routing of 40 differently MLHGs

These extensions should be set up the same way as the article describes (unreachable number of line appearances, etc.)
Once you have your extensions created, you are to point the MLHGs to the 2nd, 3rd, 4th, etc, extensions, NOT the top extension. With this configuration, the top extension is required to be there but doesn’t handle any traffic into the Contact Center.
Each extension (2nd, 3rd, 4th, etc) can now handle the routing of up to 20 MLHGs.
This setup and configuration will be unnecessary if you are routing through 20 MLHGs or below and should not be used otherwise.
Updated 7 days ago