
3CX Configuration and Best Practices
This article provides information on the best practices for configuring 3CX with Xima CCaaS.
Configuring Extension in 3CX
The first thing you'll need to do is configure an extension within the 3CX platform itself.
- Log in to your 3CX portal.
- Go to “Extensions,” which is on the left-hand side bar.
- Then click on the blue “+Add” button.
- Fill out the corresponding information. We have included an image example below, but information will differ depending on the user.

Make note of the “Authentication” section at the bottom, as this will soon be used in CCaaS to register the handset.
To see the password, click the “eye” icon.
- The last thing on this page is “Direct Inbound Dialing.” Click on the Add DID/DDI button.
You will then get a drop-down menu of available numbers you can select from.
Please note that the following section may likely be done for you, so if you’re able to select from the “Add a DID/DDI” (above) section without problem, please skip this portion on how to set up a DID.
If you don’t have a DID as a selectable option, it is likely you don’t have any more numbers available to select, the SIP provider hasn’t provided you with any more, and/or you haven’t set any more up within your system.
-
If this is the case, you will have to go to the “SIP Trunks” section, which is located on the same left-hand side bar as “Extensions.”
-
Select the provider, go to the DID tab, and click “+ Add Single DID.” Then type in the DID number provided by your service provider that you wish to use.
-
Go to the next tab down on the left-hand side bar called “Inbound Rules.” Then select “+Add DID Rule.”
-
You will want to assign this DID rule to an extension (the one you created previously to be the CCaaS virtual handset).
It will look something like this:

-
Go back to the “Extension” section on the left-hand side bar, go to the “Voicemail” tab, and disable Voicemail by unchecking the box.
-
Under the “Forwarding Rules” tab, make sure that “Accept Multiple Calls” is enabled. This is located near the bottom.
-
Under the “Options” tab, also be sure that “Block remote phone using stun (Insecure!)” is disabled. It is enabled by default.
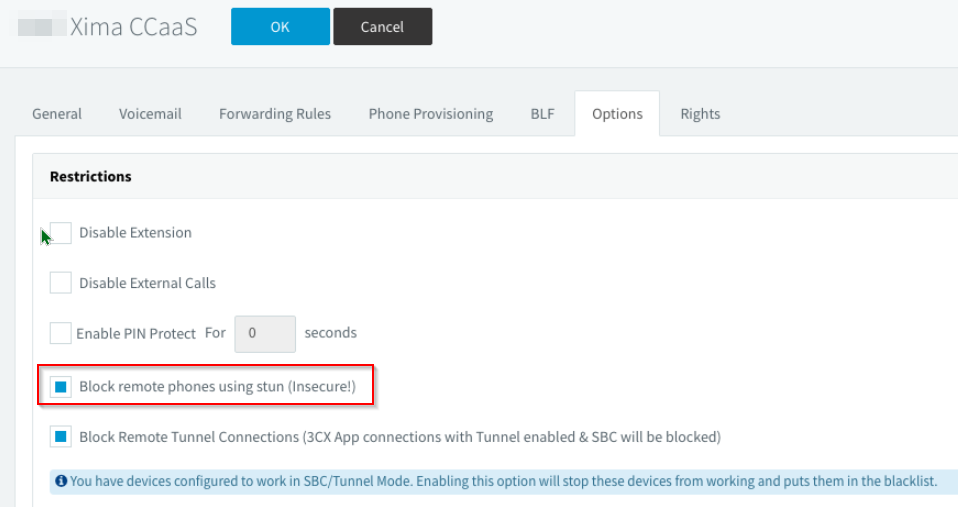
-
Under this same section, though enabled by default, make sure that all three options under “Troubleshooting” are enabled.
Though this is specific to the CCaaS Virtual Handset, this setup should be considered as best practice for ALL users that are going to be utilized as Contact Center agents.
This concludes the 3CX Portal section.
Configuring Handset in Xima CCaaS
- The next thing you need to do is configure the handset on CCaaS. To do so, sign into the CCaaS interface.
Default
Login: Administrator
Password: password
- Once logged into the interface, select the Settings option (gear icon) on the left, and then select “Target Platform Configuration.”

- A window called 3CX Platform Settings will appear. Since 3CX doesn’t have an API to pull users across, you will need to manually add them by clicking on the Manage Platform Users option.
- Click the “+” icon in the window that appears to add a user. Then fill in the name and extension as it reads in 3CX.
- To add users en masse, we have added an import option as well. Click “Import Users,” which is located in the bottom left-hand corner of the Users window, to do so.
It has been configured to accept the default. The CSV file output is as found in 3CX.
Please note and see the example below: Extensions tab > Export

- The last step to finish this off will be to go to “Manage SIP Extensions.” To do so, click the gear icon again and select “Manage SIP Extensions.” See image below.

- Fill out the information as it’s displayed on the handset you are going to utilize as your virtual handset on 3CX.
As a reminder, this will be located under “Phone Provisioning.”

Once you are all set up, you can double check the 3CX platform and see the “All Green” showing that the handset has been registered.
Here is an example of a virtual handset that was set up previously and successfully registered.

Additionally, you can check the “Manage SIP Extensions,” and you will see that the extensions show as “Registered.”
Updated 3 days ago