
Outbound Calls / Callback Assist Issues Within Netsapiens
This section will give you the step-by-step process of the likely reason why your outbound calls or Queue Callback Assist are not connecting as well as how to rectify this within the Netsapiens Admin Portal.
The most common reason for your outbound calls or Queue Callback Assist not connecting is because you don’t have a “caller ID” set against your user, and the termination carrier won’t accept the call because of it.
To correct this issue:
-
Access the Netsapiens Admin Portal
- Note: While the URL will vary depending upon your instance, it will follow this same format https://{FQDN}/SiPbx/adminlogin.php
-
Login with your Netsapiens credentials
- These login credentials are different from the standard portal you may be accustomed to
- If you don’t know what they are, you may need to reach out to your Netsapiens Admin
- These login credentials are different from the standard portal you may be accustomed to
-
Select Users and then select Configuration

Setting "callid_nmbr" for a Group of Agents
- In the bottom right-hand corner of the page, select Export
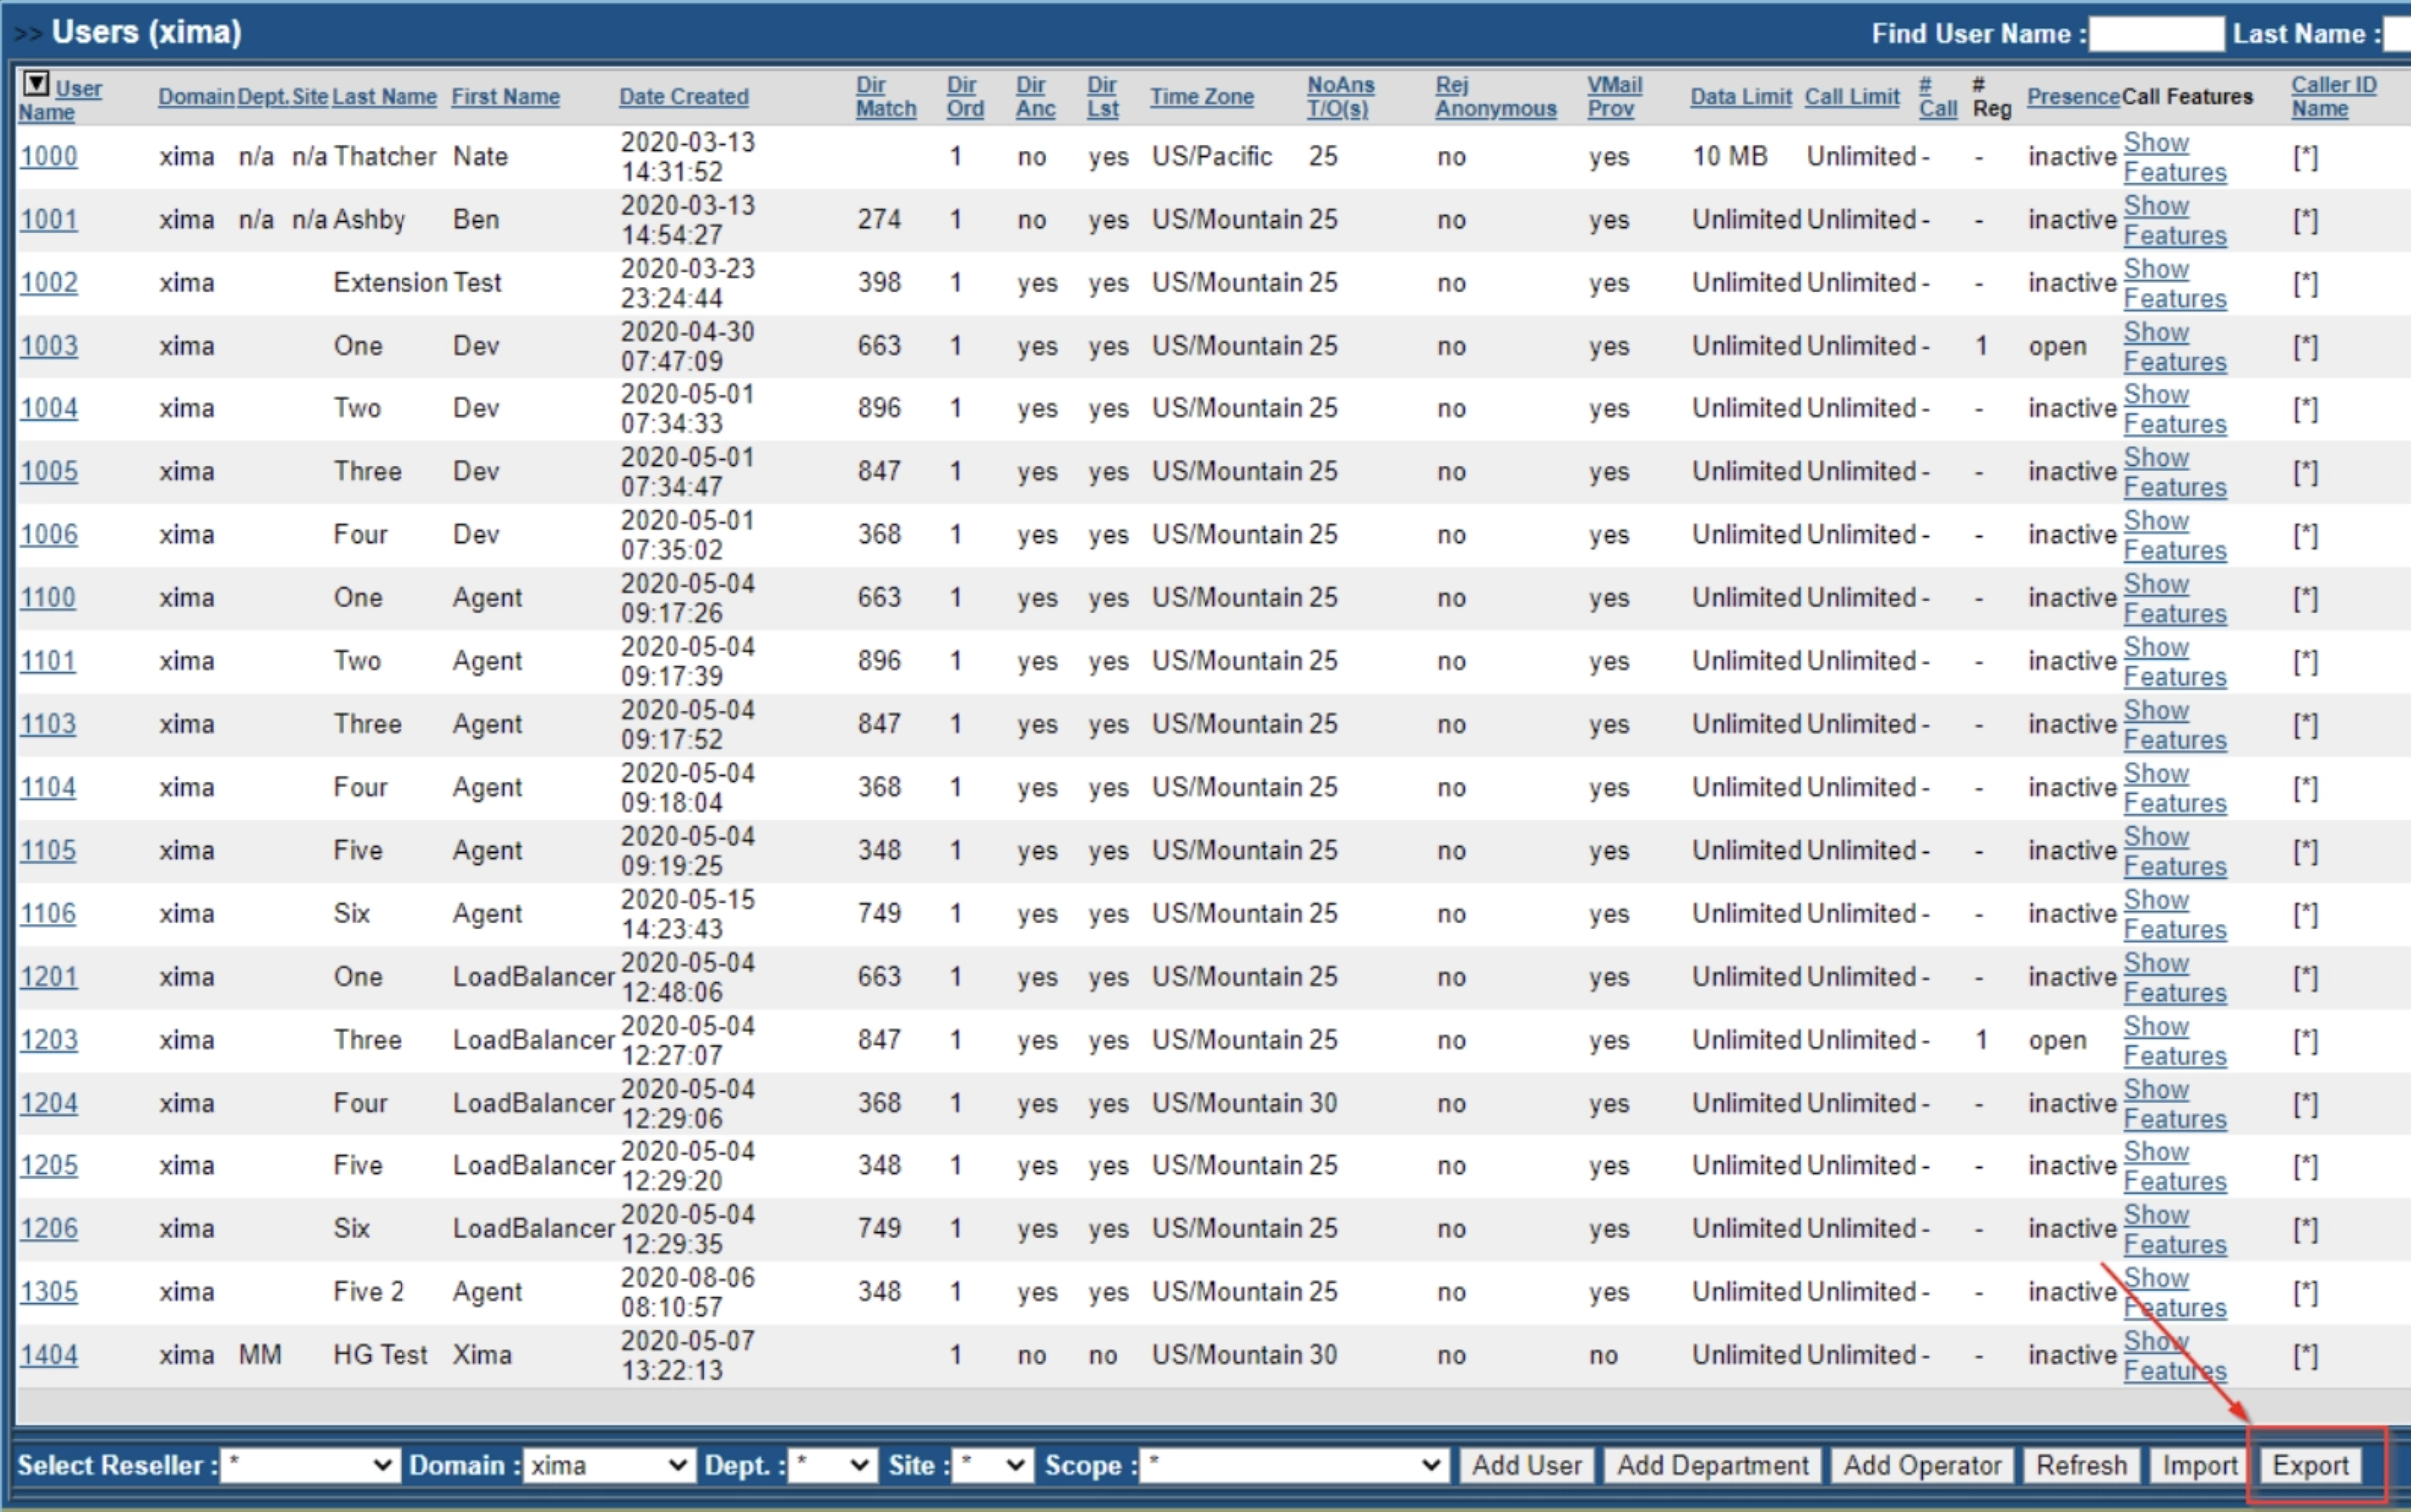
- Select the desired Domain, or (*) for all, and then select Start Export
- A CSV file will be generated containing configuration values
- Locate the callid_nmbr and callid_emgr columns
- Enter the appropriate callid_nmbr into the user's field
- Please note that the appropriate callid_nmbr can be found in the regular portal under the Inventory section
- Save your changes
- Return to Users → Configuration and select Import in the bottom right-hand corner of the page
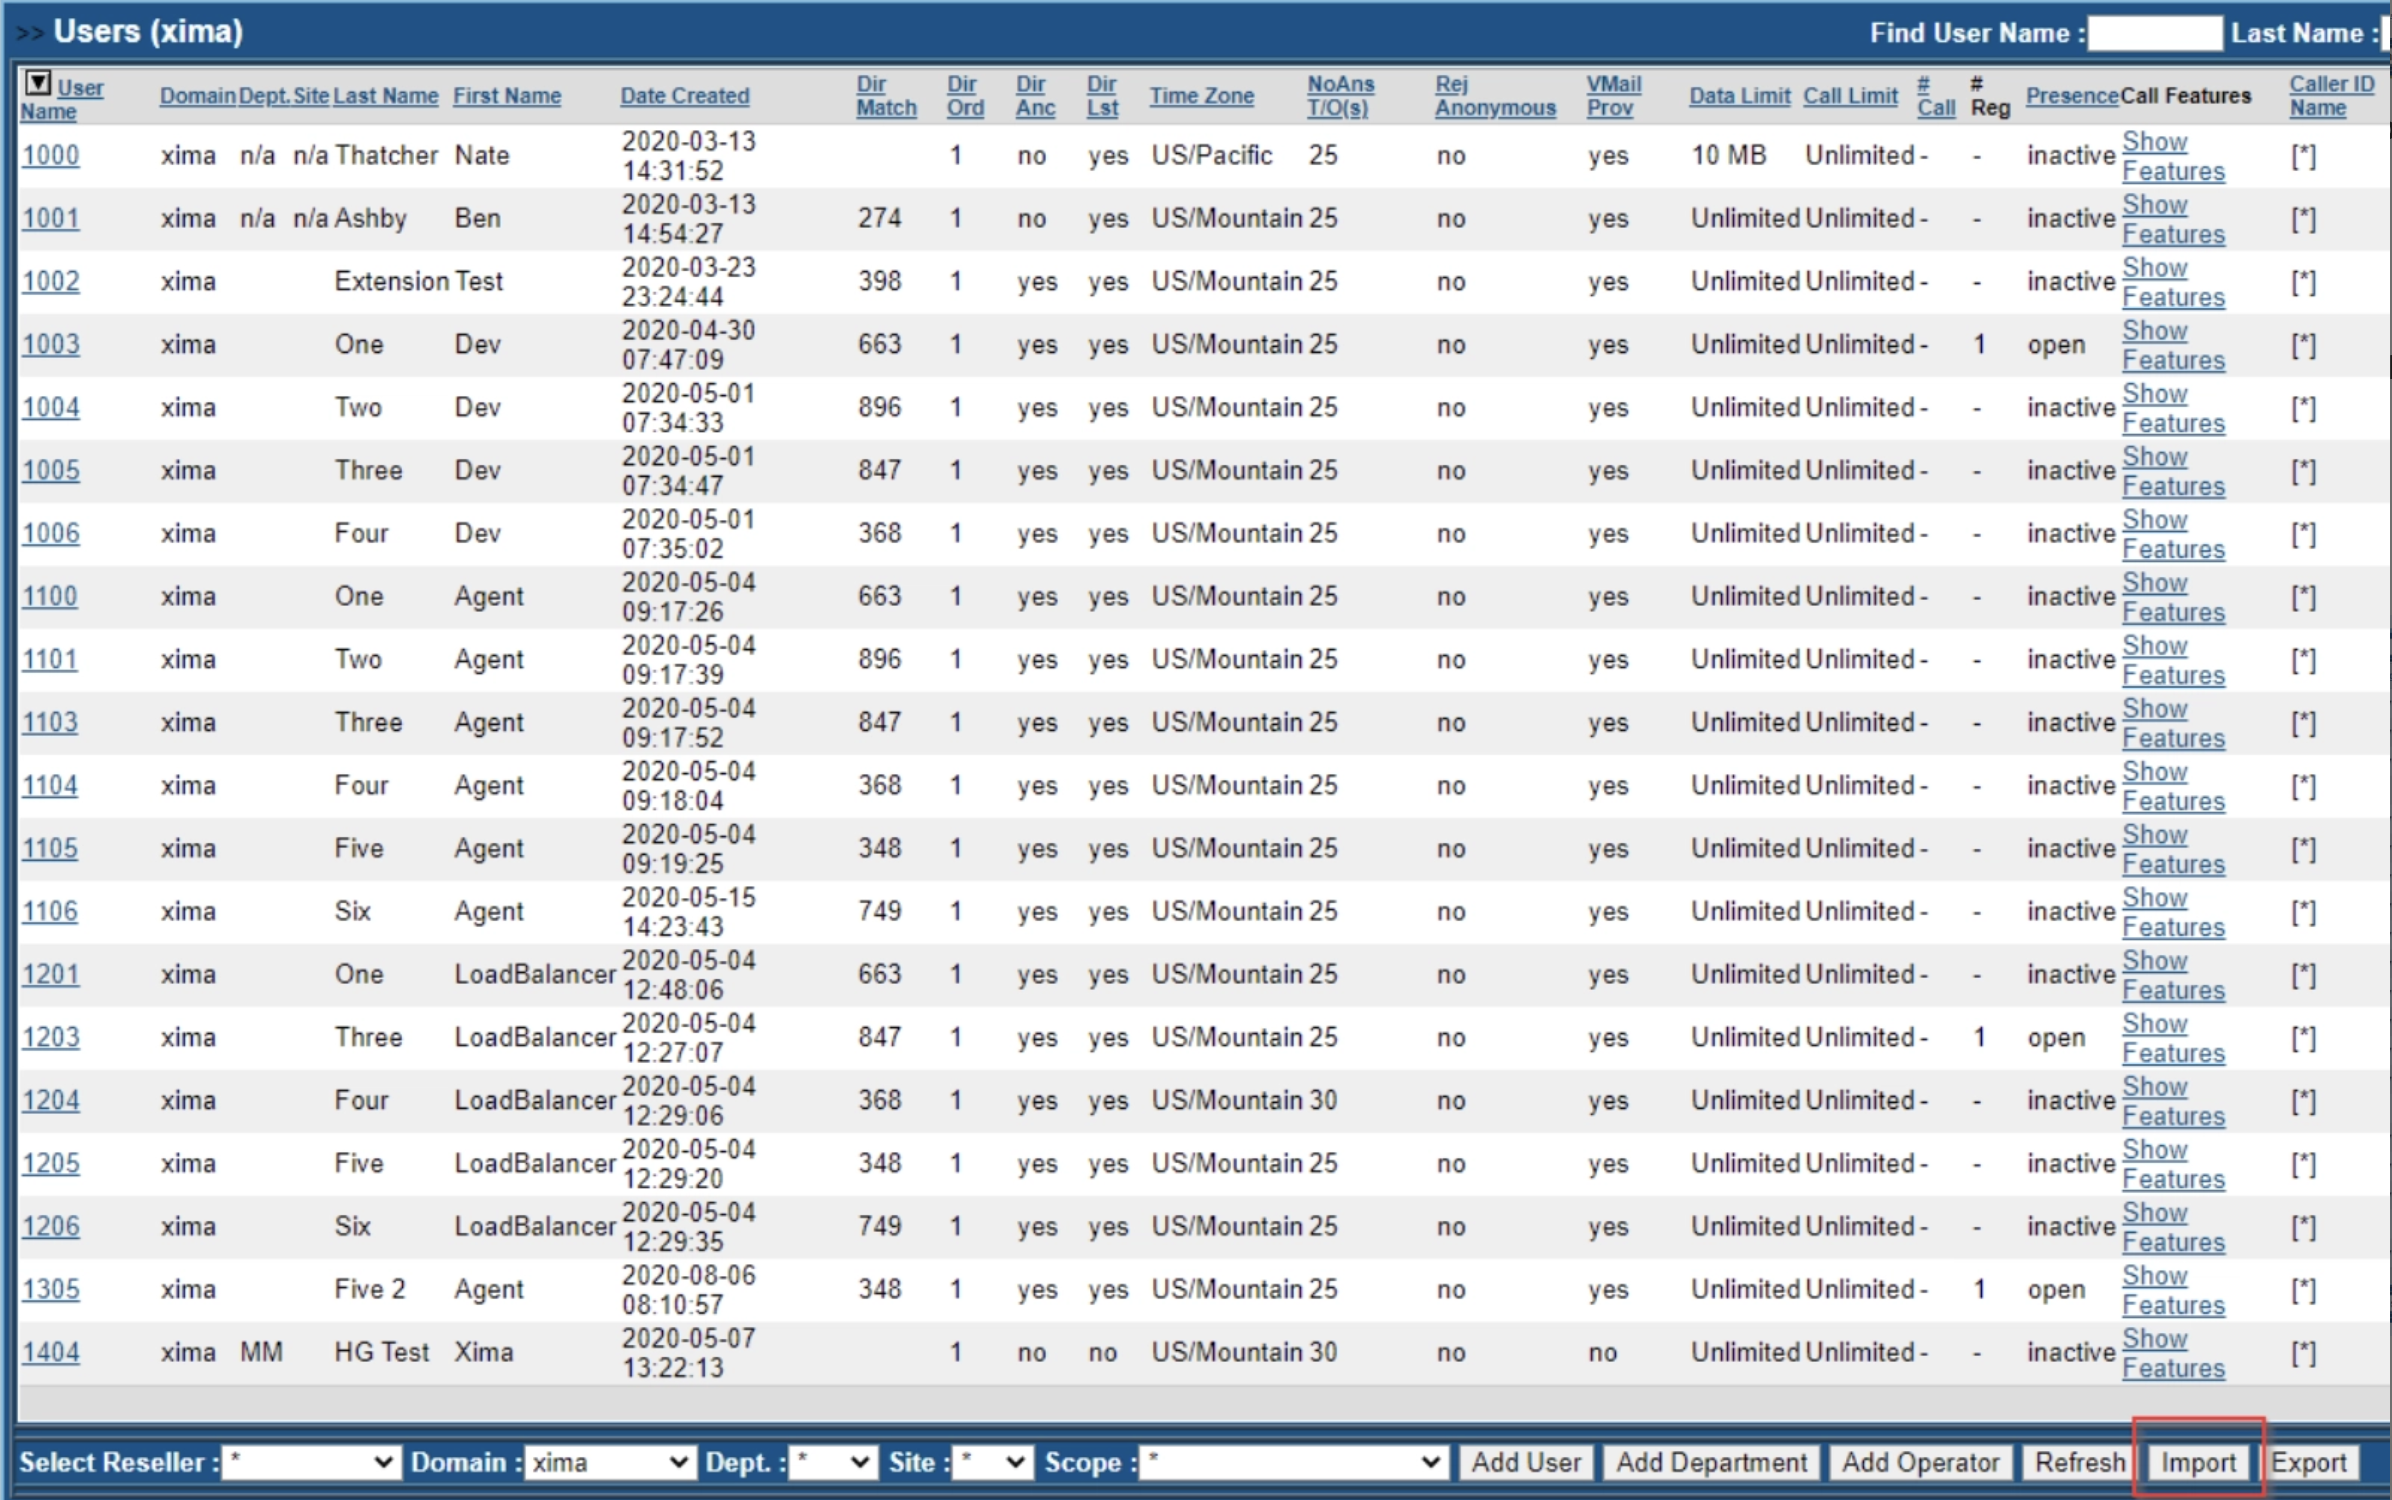
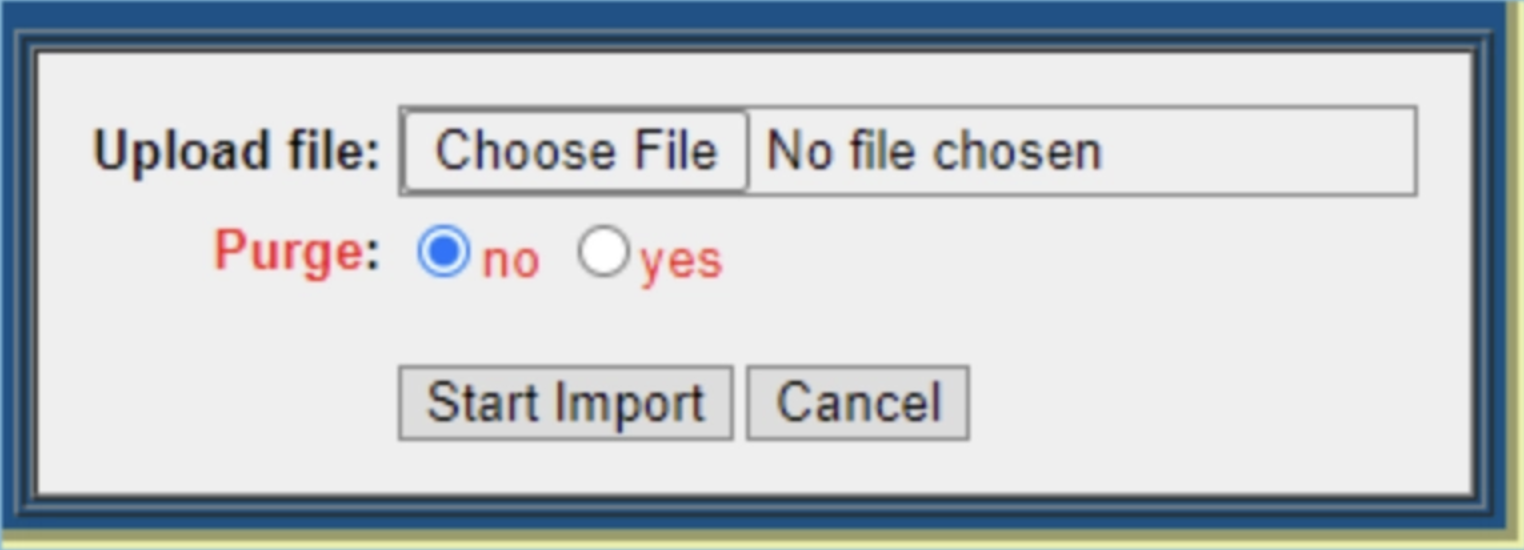
- Upload your edited CSV file and select Start Import
- When prompted to purge:
- Select No to retain existing values not in your import
- Select Yes only if intentionally overwriting everything
Setting "callid_nmbr" for One or a Few Agents
- Within the Users page, select the user you wish to edit
- You will then be presented with a user configuration screen (see below)
- Fill in the Caller ID Name, Caller ID Number, and the 911 Caller ID, and then select Modify.
- Repeat for each desired user\

Required Information to Integrate Xima CCaaS with Netsapiens
Below is the required information that you will need in order to successfully integrate Xima CCaaS with Netsapiens.
- Domain - This is the name of the domain that has been specified within Netsapiens
- sip_proxy_server_host - This will most likely be the same as the Netsapiens management portal login page
- sip_proxy_server_port - Default is typically 5060
- api_url - This is your unique URL used to access the UCaaS Netsapiens management portal
- api_client_id - This will be found in the Netsapiens Admin portal (this is separate from the Netsapiens Management portal)
- api_client_secret - This will be found in the Netsapiens Admin portal (this is separate from the Netsapiens Management portal)
- api_username - In order to make requests to the API, we need to know the login information for a user with office manager permissions at a minimum
- api_password - This is the password that is tied to the username
- DID (for testing inbound calls) - This is what allows calls into the Contact Center extension and the routing of calls
Where to Find Required Information
api_client_id and api_client
The api_client_id and api_client secret are both found on a different portal than the management portal. The Admin UI is unique to you but accessible by the following link: https://{FQDN}/SiPbx/adminlogin.php
- NOTE: You will need administrator credentials to sign in
- Once signed in to the Admin Portal, here are the rules and procedures
Rules
- Every application instance that accesses the NetSapiens API must first be registered
- This process results in the creation of a Client ID and Client Secret
- The developer must request a Client ID and Client Secret from a System Administrator
- Client ID and Client Secret are created in the Admin UI of the Core Module
Procedure
- Through the Admin UI of the core module, navigate to System > Settings > Advanced > Oauth Clients
- Click “Add”
- Enter Client ID
- Leave the “Redirect URL” field blank
- Click “Create”
- The resulting page will display the new Client ID and Client Secret
- You may have to click on Refresh to see the new information
- A Client ID may be deleted at any time from the Admin UI by selecting the Delete option from the Client ID details page
- A token may be revoked at any time from the Admin UI by selecting the Revoke option from the Token details page
sip_proxy_server_host and SIP proxy port
sip_proxy_server_host and SIP proxy port (also known as “Outbound Proxy”) can be found under the phone configuration tab for the user when you provision your phone
- Also note the port, which is next to this outbound proxy.

domain
For the domain, if you are a Super User you can find this information under the “Domain” tab
- It is also located under the “Inventory tab”
- Or, if you are an Office Manager at a minimum, you can find it under the phone provision section in the Settings menu
Unable to Pull Users from Netsapiens to Xima CCaaS
If you are unable to pull users from Netsapiens over to CCaaS, here are some troubleshooting steps to follow:
- Verify that the API login, password, Client ID, and Client Secret are correct
- Verify the permissions for the users within Netsapiens
- Verify that the password is set for the user you’re using to pull from the API
To verify all of these things, you’ll need to access the Admin Portal: https://{FQDN}/SiPbx/adminlogin.php
Once you’ve logged in, follow these steps.
- Go to System > Settings > Advanced > Oauth Clients
- Find the Oauth client you’re using to verify credentials
- To confirm permissions as mentioned in step two, go to Users > Configuration, and select the User in question
- In the “Scope” value that is located near the bottom of the user’s information, you’ll be given several options for permissions in the drop-down
- At a minimum, this user needs to be set to one of the following:
- Call Center Supervisor
- NDP
- Office Manager
- Reseller or Super User
- Verify that it says “Secure password set”
- Go to Users > Configuration, and select the user in question
- If it doesn’t show “Secure password set” you’ll need to create a new password under the “New Portal/API Password"
Updated 12 days ago