
Collect Digit Action
If you'd like the IVR to collect a string of digits from the caller, this article will explain how to configure a Collect Digit Action to accomplish exactly that.
Use Case
- Your calls will be more efficient if the caller provided their account or customer number prior to reaching an agent
Adding a Collect Digit Action to an IVR
-
While configuring a new IVR Call Flow (or editing an existing one), select the "+" box to add a new condition/action

-
Select "Collect Digits - Action" from the dropdown list
-
In the "Collect Digits Query" menu, you'll have the following options:
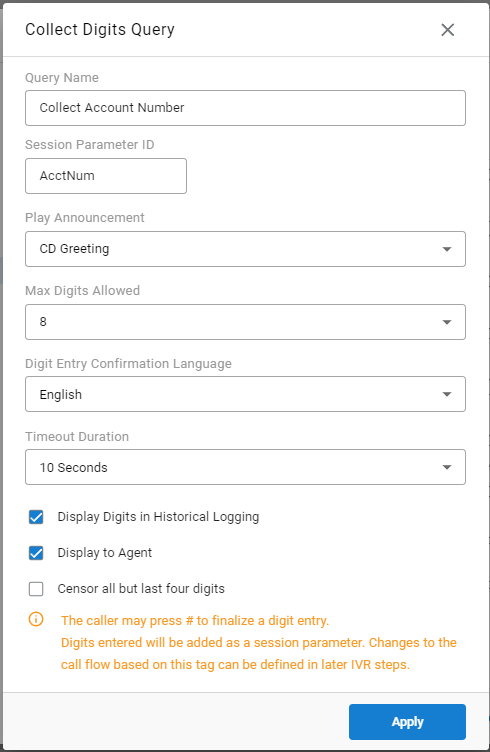
Query Name - What will this action be displayed as in the flow and in historical reporting? As an example, you may call it "Collecting Account Number"
Session Parameter ID - This will serve as the key name for the value collected. It will also be available as a session parameter for other call behavior changes if desired (using a Parameter Condition).
Using the example above, numbers collected from callers will be shown to agents and logged historically as "AcctNum = <the numbers entered>"
Play Announcement - This is the greeting the caller will here when reaching this step in the IVR. Best practice would be to inform the caller what action they need to take at this time.
As an example, your recording could say "Please enter your account number"
Max Digits Allowed - Default is "Unlimited". It is recommended you adjust this to the maximum number of digits expected for the input. Once this limit is reached, the entry will be complete and the call flow will continue
Note: Pressing "#" is not required if the limit is reached. Keep that in mind when recording this menu greeting. They can press # to move on if they don't have their account number or if they did not enter enough digits.
Digit Entry Confirmation Language - When the caller has completed their entry, we'll read back what was successfully entered. For example, "The number you entered is 46331487. Press 1 if correct. 2 if incorrect."
Here you may choose the language of this experience. If you have added a language pack of your own, you will see it in this list as well.
Timeout Duration - This setting is the amount of time we'll allow the caller to enter their digits. If the timeout is reached, whatever digits the caller has entered up until that moment will be attached to the call. This helps prevent someone from being stuck in this menu if their digits are not being recognized.
Display Digits in Historical Logging - If this checkbox is enabled, the parameter ID and its value will be displayed in C2G and available for searching and reports. If disabled, there will be no record of the session parameter entered in the Xima data base which may be required for compliance depending on your industry.
Display to Agent - If the checkbox is enabled, the parameter ID and its value will be displayed in CCAC for the agent to see while on the call with the customer.
Censor all but last four digits - If this checkbox is enabled, only the last 4 digits of the entire string entered by the caller will be visible. This applies to both the agent visibility and historical review (depending on which are selected previously)
Make sure to save your changes.
Adding a Collect Digits Action to an existing condition as a sub-action
-
If you are interested in only having the caller prompted to enter digits if a certain condition is met, simply hover over the bottom edge of the condition until an indented "+" box appears. Then select the "+" option:

-
Select "Collect Digits - Action" from the resulting dropdown menu and follow all steps as outlined above.