RingCentral Configuration and Best Practices
This article provides information on how to configure RingCentral to work with Xima CCaaS. It also provides some tips on best practices.
Configuration
When configuring RingCentral to work with Xima CCaaS, you must have a minimum of a single Essentials license (Basic licenses are ineligible). This Essentials license will serve as a SIP handset to route calls to the Xima CCaaS service. The content below provides the steps needed to create this SIP Virtual Handset within the RingCentral platform.
-
Sign into your RingCentral account. This account must be set up for Administrator access.
For production environments: https://service.ringcentral.com/ -
Once you’ve logged in to the RingCentral portal, go to “Phone System, and then "User Phone."
-
Find the extension you wish to use as your Virtual Handset, and click on the ellipsis tool on the right.
At this point in the configuration, the RingCentral users that have been set aside for the Xima CCaaS configuration should have a device assigned to them at the time of setup. If they do not have a device assigned to them, please work with the provider to get a device assigned to these users before you configure them within Xima CCaaS.
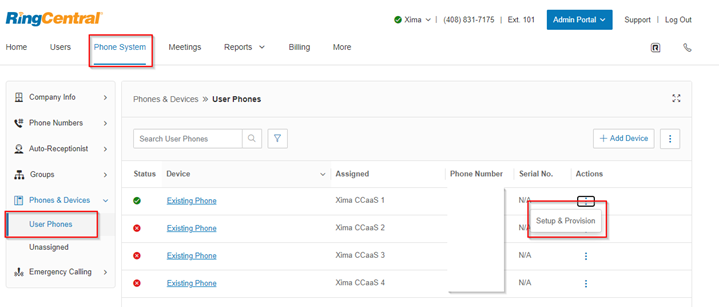
- Click “Setup and Provision.”
You’ll then see a list with many different phones.
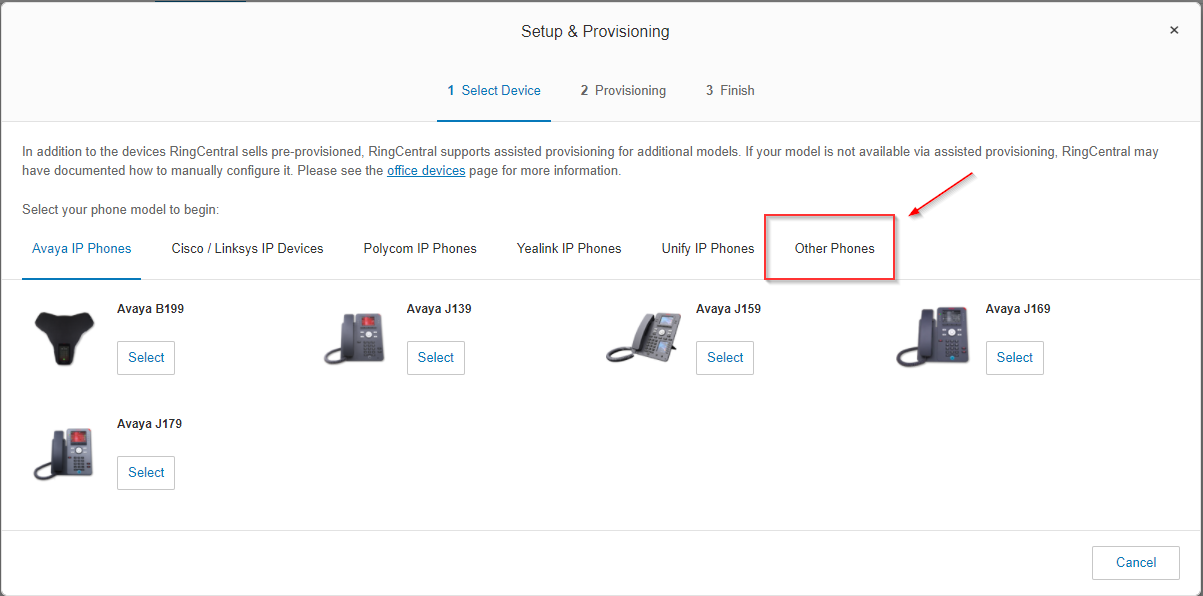
Since this is going to be virtual, you don’t want to use a physical phone for the virtual handsets.
- In this case, click on “Other Phones” and then hit “Select.”
It will then bring you to the configuration page. Make note of these settings, and be sure on the “Outbound Proxy” section that you select the appropriate region associated with your RingCentral account (E.g, Europe, North America, etc.).
We will then enter these settings within the Xima CCaaS system settings.
- Sign in to yourXima CCaaS instance. (Likely it will be something like this https://FDNQ.xima.cloud/web/login)
Default
Login: Administrator
Password: password
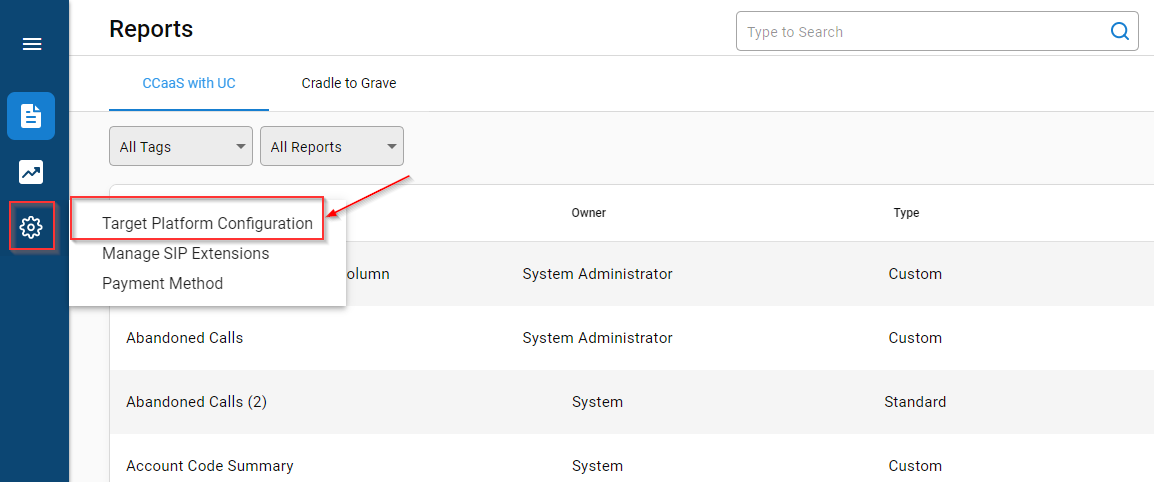
On the main page, look for the gear icon.
- Click on the gear icon, and then select “Target Platform Configuration.”
- You’ll notice that the setting in the window says, “NOT_AUTHENTICATED”. Click on the “Authenticate” button. This will direct you to your RingCentral login.
- Log in with your credentials. Please note that this user needs to be a Super Admin.
If the login was successful, you’ll be giving Xima CCaaS permission to the following APIs.
Once done, you'll see the below screen. Click "Authorize."
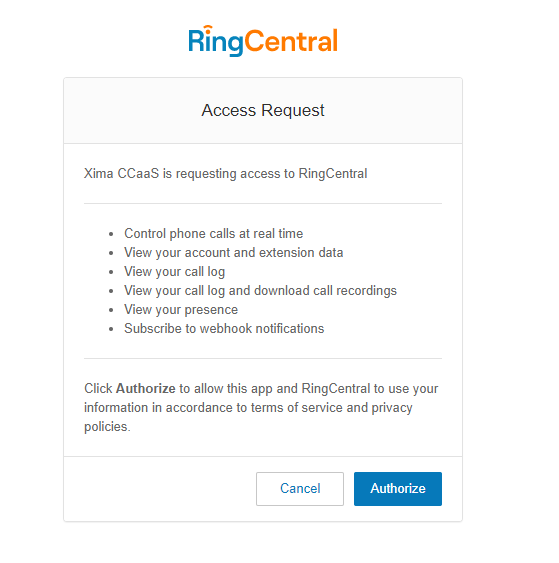
This will bring you back to Xima CCaaS and show as “AUTHENTICATED”. Like so:
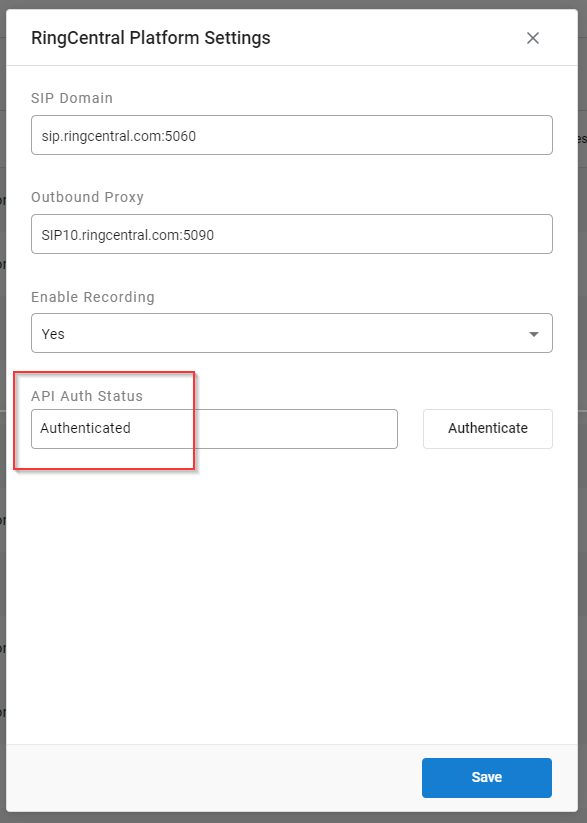
- Go back to the main menu and click the gear icon again. This time select “Manage SIP Extensions.”
- Click the “+” icon to add in your Virtual Handset extension.
- Fill out the information that you’ve noted previously, and then click “Save.”
Assuming you’ve entered the credentials correctly, you’ll see that the handset has registered.
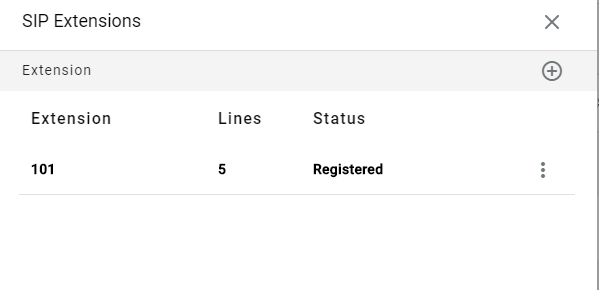
Note: You will need to repeat this process for every extension you have designated to work with the Xima CCaaS service. Remember, you can only have up to four simultaneous Contact Center calls per extension. For the case of a single extension, this is 4 simultaneous calls.
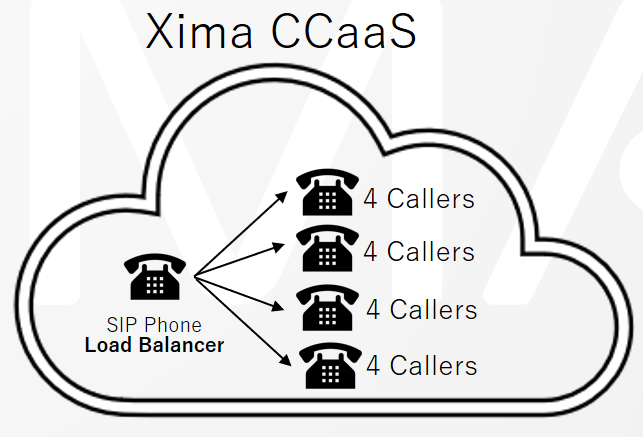
However, if you need to scale beyond 4 simultaneous calls, the understanding on how this is designed needs to be understood. As an example, if you need to have 8 simultaneous calls, it will require 3 SIP handset extensions within CCaaS, which means that you’ll need 3 UC extensions purchased and available within RingCentral. The first (primary) extension will serve as a “load balancer,” which hands off the calls in the Contact Center queue over to the other two extensions in the list.
As an example, this is what it looks like if you were to configure your system to handle up to 8 simultaneous calls.
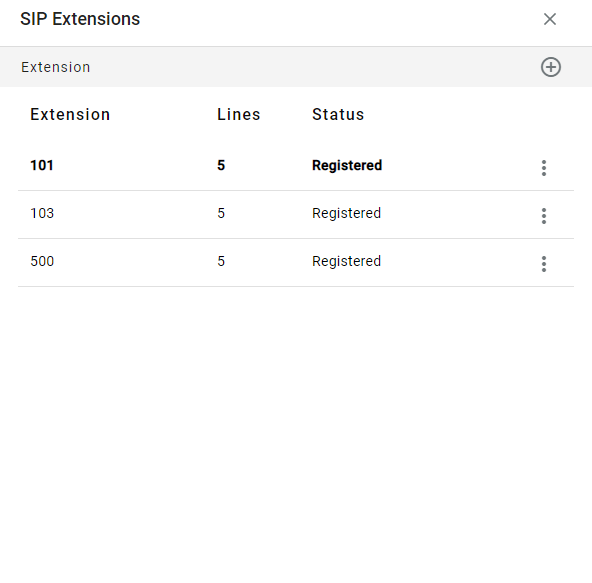
The bolded extension (101) is known as the “Primary Extension” or “Load Balancer.” Every corresponding extension after that is what will be handling the calls.
For additional context here is a diagram of this process:
Here is a simple formula in determining the number of handsets you need:
X (how many simultaneous calls do I need?) divided by 4 (number of calls per SIP handset) + 1, (which will be the handset to serve as the load balancer). For the best performance, we recommend no less than three.
Additional Tips
Once you have your RingCentral handset(s) registered, you'll need to make sure of a few things on the RingCentral side for those users.
Virtual Handset Extension Configuration
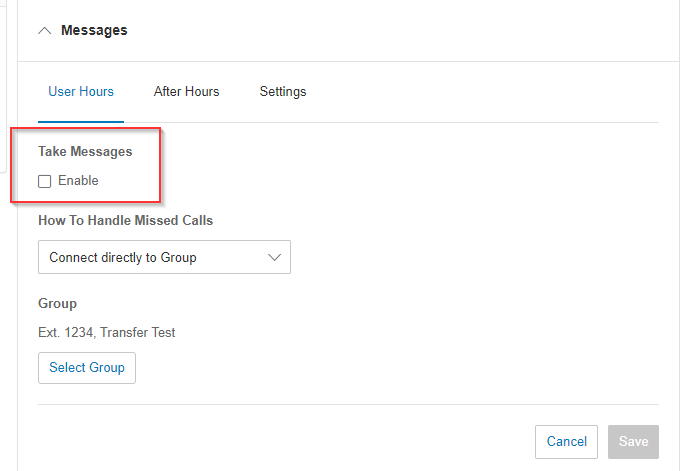
- Please disable your Voicemail Box on the Virtual Handset(s) that you’ve configured. You can do this by going here: Users > Click User Name > Expand the Messages section. Disable the “Take Messages” section.
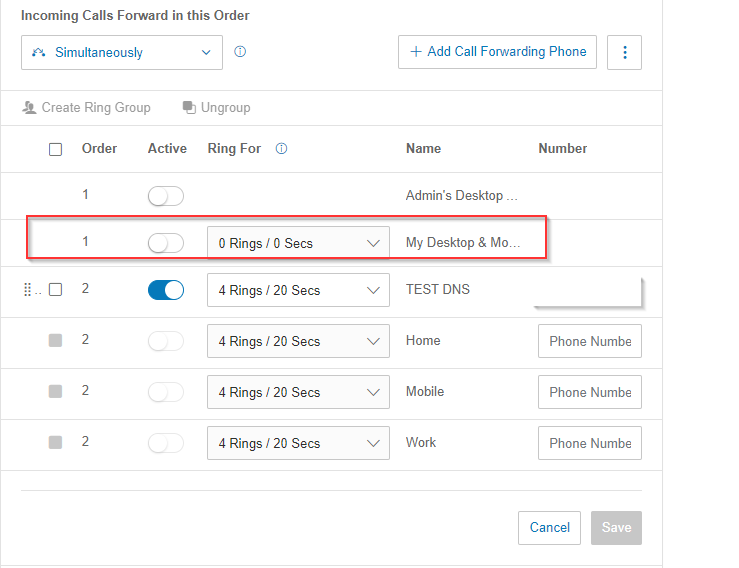
- Go to Users > Click User Name > Expand the Call Handling & Forwarding section. By default, it’s going to ring the “My Desktop & Mobile" first. The standard practice is to disable this. "Disable" means that this is not blue.
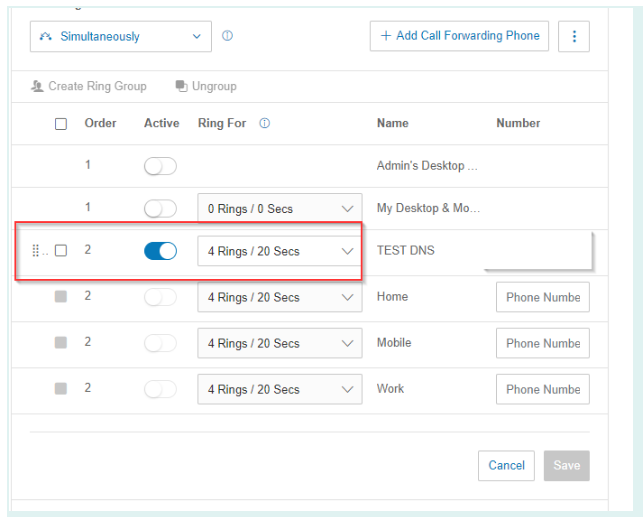
- Go to Users > Click User Name > Expand the Call Handling & Forwarding section. The time listed here in RingCentral MUST be greater than the time listed within the Xima CCaaS ring time configuration. See the example below, showing the 20 second ring time:
The default in Xima CCaaS is 15 seconds and is found under the System Settings as part of the Admin Portal. To access the portal, you’ll need to open up Internet Explorer https://FQDN of your CCaaS Instance. Do NOT include /web at the end. Login credentials are the same as with the HTML login.
Go to Admin (System) > System Settings > Voice Agent.
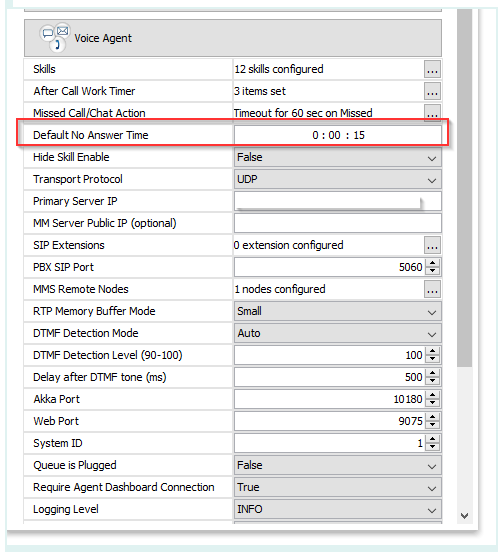
If the time listed here is greater than that of RingCentral, then the call handoff from the virtual handset will go to a voicemail or “No one is available” message. We want to maintain control of this call, and as a result, this time needs to be less than that of RingCentral.
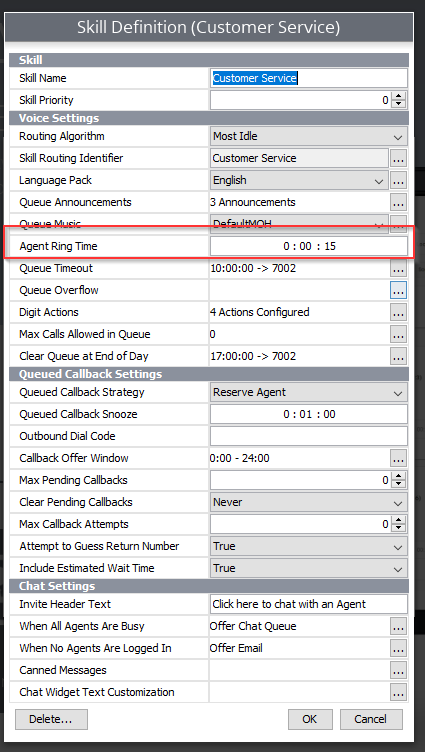
This is a system wide setting, but this will also work on a per skill basis by selecting the “Agent Ring Time” option within the skill itself.
This setting is found under the skill definition itself on the Admin Portal. Go to Contact Center Configuration > Skill Management > Ellipsis tool for the skill group itself > Agent Ring Time.
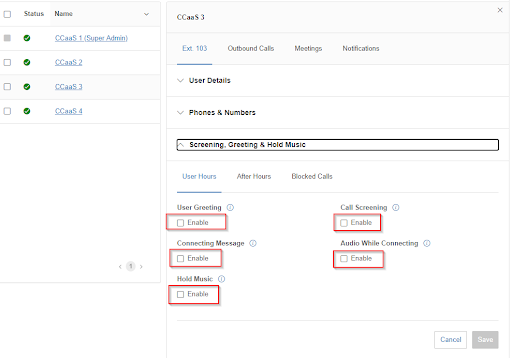
- To properly have Contact Center calls roll over and be managed by Xima CCaaS, you must go to this section and disable all of the red highlighted sections under “Screening, Greeting & Hold Music.” To disable, uncheck all associated boxes.
RingCentral Contact Center Agent Configuration
Similar to the Virtual Handset, though a few differences are suggested. The most important one is item number one.
- Go to Users > Click User Name > Expand the Call Handling section
- Under Incoming Calls, set it to "Ring all at once"
- NOTE: If you have it set to "Ring in order" and swap between a soft and hard phone, your Contact Center Agent Client will pop up but will be delayed in ringing your hard phone until the duration of the first phone has been reached
- You can also adjust your different handsets in this section
- By default, it will always ring the “My desktop & mobile apps” line
- If you are using your RingCentral softphone or mobile app, keep this line enabled and set to "Ring all at once" as above
- If you are not going to use one of these applications, either disable it or set it to "Always Ring"
- NOTE: By setting Incoming Calls to "Ring all at once" and "My desktop & mobile apps" to "Always Ring", you can interchangeably switch between the softphone and hard phone without having to change these setting each time you want to sign into the Contact Center
- By default, it will always ring the “My desktop & mobile apps” line
- If you are taking direct calls as well as Contact Center calls, it’s okay to keep the default settings for the “Screening, Greeting, & Hold music” as is
RingCentral Installation Tutorials
RingCentral Configuration
RingCentral Handset Best Practices
Updated 3 months ago
