
CallHub
Call Hub is Xima's current WebRTC calling mode, providing Blind Transfer, Assisted Transfer, Conference, and Agent Voicemail from the CCAC call control widget.
Call Hub (available on CCaaS version 5.62+) is Xima's current WebRTC calling mode for agents using the native softphone in CCAC. It replaces an older, more limited WebRTC calling mode that supported only basic internal calling, a simplified assisted transfer, and manual conferencing. Sites are being migrated from the legacy mode to Call Hub over time, so both sets of behavior are documented below.
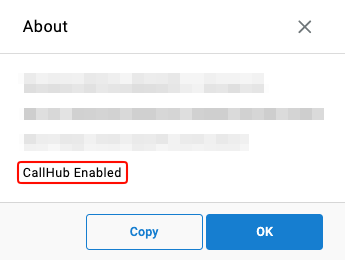
Confirming Call Hub ModeTo confirm whether Call Hub is active for an agent, select the name/avatar icon in the top-left corner of CCAC and select
About. If theAboutdialogue displays aCallHub Enabledbadge, the Call Hub behavior below applies. If the badge is not present, the legacy behavior applies instead.
Call Hub Mode
Transfers
| Transfer Type | What Happens |
|---|---|
| Blind Transfer | The call is transferred immediately. The agent is removed from the call at the moment of transfer without speaking to the receiving party first. |
| Assisted Transfer | The agent calls the destination party and speaks with them privately before connecting the original caller. The agent controls when the transfer completes. |
While on an active call, selecting the Transfer/Conference icon in the call control widget opens a menu with Blind Transfer, Assisted Transfer, and Conference options.
Performing an Assisted Transfer
-
From the Transfer/Conference menu, hover over
Assisted Transferand selectNew Transfer Destination -
Select a transfer destination:
Method Description Dial Pad Manual entry of any internal or external number Agent List Available CCAC agents, filterable by name Skill Groups Configured skill groups, filterable by name Phone Book Internal and external contacts from the organization's directory -
Once the destination party answers, speak privately with them before completing the transfer —
Switchtoggles between the original caller (on hold) and the transfer destination -
To complete the transfer, select the Transfer/Conference icon again, hover over
Assisted Transfer, and select the original caller's number from the submenu
Original Caller Is Held AutomaticallyInitiating an Assisted Transfer automatically places the original caller on hold — no manual hold action is required.
Performing a Blind Transfer
- From the Transfer/Conference menu, select
Blind Transfer - Select a transfer destination using any of the methods above
The call transfers immediately once a destination is selected or dialed, and the agent is removed from the call.
Conferences
- From the Transfer/Conference menu, hover over
Conferenceand selectNew Conference Participant - Select a conference destination using any of the methods listed under Transfers above
- Once the destination party answers, speak privately with them before completing the conference —
Switchtoggles between the original caller (on hold) and the new participant - To complete the conference, select the Transfer/Conference icon again, hover over
Conference, and select the original caller's number from the submenu
All parties connect immediately once completed, and the Details tab lists every participant on the conference.
Adding Notes or CodesBefore closing the Call Ended screen at the end of a transfer or conference, notes or account codes can still be added for the interaction.
Agent Voicemail
Agent Voicemail is a Call Hub-only feature that routes an unanswered direct, internal, or transferred call to a personal voicemail box instead of the standard No Answer Destination.
Does Not Apply to Skill CallsIf an agent is presented a queued (skilled) call and does not answer, the call rolls to the next available agent regardless of this setting. Agent Voicemail only applies to direct, internal, or transferred calls to the agent.
Enabling Agent Voicemail as a No Answer Destination
-
Navigate to
User Management > Agent Licensing -
Select the ellipsis for the applicable agent and select
Edit -
Locate
No Answer Destinationand select the edit icon
-
Set the Destination Type to
Agent Voicemail -
Save the changes
Managing Voicemail Greetings
Agents configure their own greetings from the CCAC agent options menu.
-
Select the ellipsis next to the agent name and select
Voicemail Greetings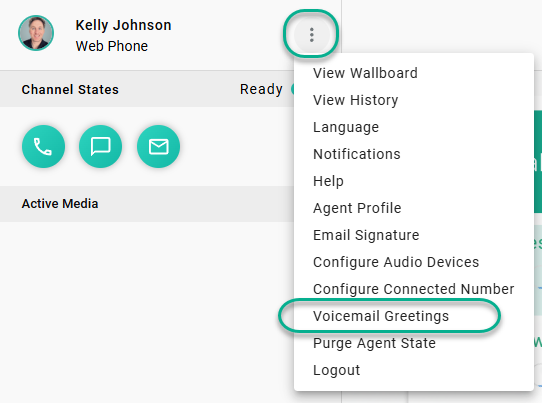
-
Select a previously uploaded greeting for each greeting type, or select
Manage Greetingsto upload a new greeting via file or microphone recording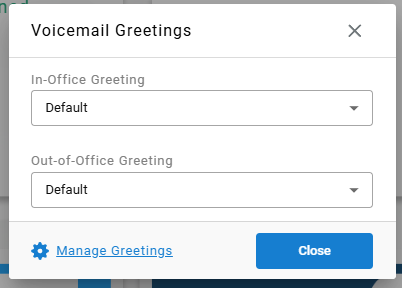
In-Office vs. Out-of-Office GreetingsThe in-office greeting plays when the agent is logged into the contact center but misses the call. The out-of-office greeting plays when the agent is not logged in. Greetings should set expectations for callers on when to expect a return call.
Reviewing Voicemails
A card appears in the lower-left of CCAC when a pending voicemail exists for the agent. Selecting the card opens History with the applicable filters pre-selected. Pending voicemails display with a blue, unopened icon; selecting a voicemail opens it for review, and reviewed voicemails can be returned to pending by selecting the opened-mail icon.
Pending

Voicemail

Read

Legacy (Non-Call Hub) Mode
Internal Calls and Assisted Transfer
- Select the
+icon, thenNew Callwithin CCAC - Dial by number, or select the agent icon to view available WebRTC agents
Once an internal call is answered, the receiving agent has Mute, Hold, Transfer, and End Call available.
Assisted Transfer
-
While on a call, select the agent icon to choose a transfer destination:
Destination Notes Type Number Internal or external — logging ends at the transfer event since this leaves Contact Center WebRTC Agent Blind or assisted transfer directly to a ready WebRTC agent Skill Group Blind or assisted transfer into a skill group -
Once the receiving party answers, select
Cancel TransferorComplete Transfer
Transfers Outside of Contact CenterBecause WebRTC exists outside of the integrated UC platform, any transfer to a destination outside CCAC is considered outside of Contact Center — Cradle to Grave logging ends at the transfer event.
Conferencing
- After answering a call, select
Transfer/Conference, then select the user or dialable number to conference in - Select
Conferencenext to the desired party Cancelreturns to the original party; once the new party answers,Add to Callbrings them into the conference
Five-Party LimitConferences under legacy mode are limited to five parties collectively. The initiating agent must be using the native WebRTC device — a conferenced-in phone system user cannot initiate a conference from within CCAC.
Conference events are logged and reportable in Cradle to Grave.
Updated 2 months ago