
NS — Target Platform
Authenticates CCaaS to a NetSapiens platform and configures the connection settings so SIP extensions can be registered and calls routed through the system.
An API user and an OAuth client, both created in NetSapiens, authorize CCaaS to communicate with the platform. This authentication is completed once per CCaaS tenant and must be in place before any SIP extensions can be registered — see SIP Extensions.
Accessing Target Platform
Target Platform is accessible to accounts with Admin permissions.
- Navigate to
Admin (System) > Target Platform Configuration - A "Netsapiens Platform Settings" window opens for entering the platform's connection details
Requirements
Setting up Target Platform touches three separate systems, each requiring its own access:
| Interface | Needed For | URL |
|---|---|---|
| NetSapiens Admin (NMS) Portal | Generating the Client ID and Client Secret, and verifying the API user's call limit | https://<FQDN>/SiPbx/adminlogin.php |
| CCaaS instance | Registering the new contact center with NetSapiens | https://<hostname>.xima.cloud/ |
| NetSapiens Manager Portal | Creating the API user and its connection information, via an Office Manager–level user | Provided by the NetSapiens partner |
Creating an API User
The API user serves both as the credential CCaaS uses to reach the NetSapiens API and as the extension used to receive calls from the Contact Center.
- Log in to the NetSapiens Manager Portal
- Select
Usersfrom the top of the portal - Select
Add User - Complete the user fields
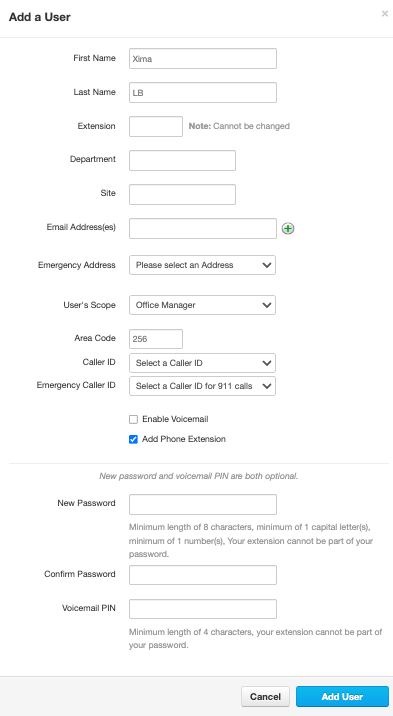
Load-Balancer RequirementNaming the user
Xima LBorXima CCaaShelps prevent it from being mistaken for a live agent and accidentally deleted. Scope must be set toOffice Manageror higher — anything lower prevents the API connection from working correctly.Enable Voicemailshould be disabled.
- Select
Add User
Verifying Unlimited Call Capacity
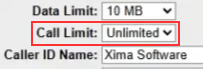
Call Limit defaults to Unlimited, which is the recommended setting for this user, though it can be lowered if needed.
- Log in to the NetSapiens Admin Portal
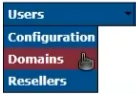
- Select
Usersfrom the top of the portal - Select
Domains
- Locate the API user created above and select it
- Confirm
Call LimitreadsUnlimited
Creating OAuth Credentials
Each application accessing the NetSapiens API — including CCaaS — authenticates with its own OAuth client.
- Log in to the NetSapiens Admin Portal
- Select
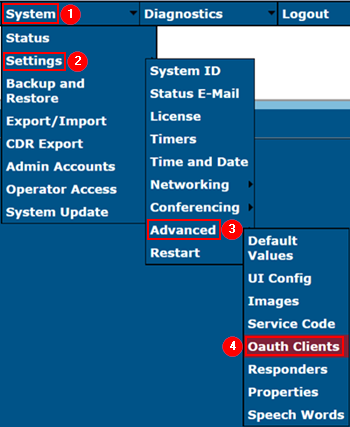
Systemfrom the top of the portal, then navigate toSettings > Advanced > OAuth Clients
- Select
Add - Enter a Client ID name and select
Create - Select the newly created Client ID to reveal the associated Client Secret
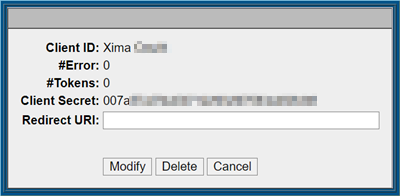
- Record the Client ID and Client Secret for use in CCaaS
Revoking AccessA Client ID and Secret can be revoked or deleted at any time from the OAuth Clients page, which immediately disconnects the associated application.
Choosing a Connection Method: SRV Record vs. SIP Outbound Proxy
An SRV record is the default and best-practice way to connect CCaaS to NetSapiens, since it follows the platform's own failover process across data centers.
Requesting the SRV RecordIf the SRV record is not known, the NetSapiens partner responsible for the deployment can provide it.
If the SRV record is unavailable, a SIP Outbound Proxy can be entered instead:
- In the NetSapiens Manager Portal, under the assigned domain, select the API user created above
- Navigate to that user's
Phonemenu and edit the phone

- Within the
Settingsmenu, copy theOutbound Proxyvalue
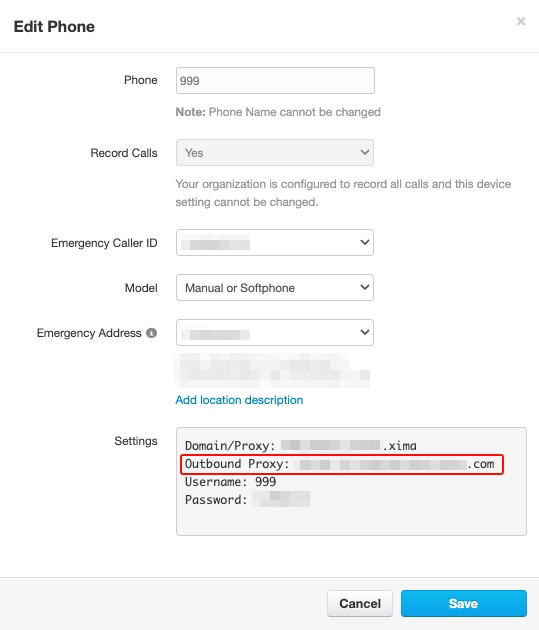
- Paste this into the
SIP Outbound Proxyfield in the Target Platform Configuration window
No Automatic Failover with Outbound ProxyA connection made using a SIP Outbound Proxy instead of an SRV record will not automatically fail over between data centers.
Required Platform Information
The following fields make up the Netsapiens Platform Settings window in CCaaS, in the order they appear. Domain, SRV Record (or SIP Outbound Proxy), API URL, Client ID, Client Secret, Admin Username, and Admin Password are required; the remaining fields are optional and can be left at their defaults. Where NetSapiens documentation refers to a field by its underlying parameter ID rather than this label, that ID is listed alongside it.
| Field | Parameter ID | Description |
|---|---|---|
| Domain | — | The domain assigned within the NetSapiens environment, found under Domain, Inventory, or the phone provisioning section |
| SRV Record | — | The default and best-practice connection method — see Choosing a Connection Method above |
| SIP Outbound Proxy | sip_proxy_server_host | Used only if the SRV Record is not known — the Outbound Proxy value from the API user's phone configuration, entered without the port. The port itself (sip_proxy_server_port) defaults to 5060 unless the NetSapiens partner specifies otherwise. |
| SIP Transport Protocol | — | The transport protocol used to register with the NetSapiens platform — see Connection Resiliency Settings |
| API URL | api_url | The base URL of the NetSapiens Manager Portal, up to and including the domain |
| API Backup URLs | — | Optional additional API URLs CCaaS falls back to if the primary API URL is unreachable |
| API Preferred Server | — | Optional — see Connection Resiliency Settings |
| Client ID | api_client_id | The OAuth credential created above |
| Client Secret | api_client_secret | The OAuth credential created above |
| Admin Username | api_username | The API user's credential created above (for example, 999@<domain>, where 999 is the API user's extension and <domain> is the NetSapiens domain) |
| Admin Password | api_password | The API user's credential created above; the account must show "Secure password set" |
| Drop Delay in Milliseconds | — | Optional — see Connection Resiliency Settings |
| Presence Check Interval in Seconds | — | Optional — see Connection Resiliency Settings |
| Stuck Calls Check Interval in Seconds | — | Optional — see Connection Resiliency Settings |
Set Aside a DID for TestingA DID assigned within NetSapiens and routed to the CCaaS virtual handset should be set aside before starting this configuration, so inbound call routing can be tested once the connection is complete.
Entering Platform Settings in CCaaS
- In the NetSapiens Manager Portal, navigate to
Domains > {Assigned Domain} > Users, locate the API user's extension, and select its edit icon, thenPhones - Note the Domain/Proxy and Outbound Proxy shown in the Edit Phone window
- In the "Netsapiens Platform Settings" window in CCaaS, enter each field listed in Required Platform Information above
- Select
Save
Verifying API Access
Once saved, the connection can be confirmed from several places in CCaaS where NetSapiens user and licensing data is pulled in.
UC Phone Licensing
- Navigate to
User Management > UC Phone Licensing— see UC Phone Licensing - If UC users are listed, the domain has connected successfully
- An empty list means the connection has not finished completing, or a sync has not yet been triggered — see Sync UC Users below
Sync UC Users
- From the
User Managementmenu, select Sync UC Users to send a new sync request to the platform - Return to
UC Phone Licensing— if the list now populates, the connection succeeded
If users still cannot be pulled from NetSapiens into CCaaS, the following should be checked:
- The spelling and formatting of the API URL, Client ID, Client Secret, Admin Username, and Admin Password
- The API username and password are correct, and the account shows "Secure password set"
- The API user has sufficient permissions
Testing Credentials DirectlyThe Admin Username and Password can be tested independently of CCaaS by logging into the API URL directly with those credentials.
API Access vs. SIP RegistrationThe steps above confirm the API connection used to sync users and licensing data. The SIP connection used to actually place and receive calls is registered separately — see SIP Extensions to verify an extension is registered for calls.
OAuth clients can be reviewed under System > Settings > Advanced > OAuth Clients in the NetSapiens Admin Portal; user permissions under Users > Configuration > {User} > Scope. If issues persist, Xima Support can assist further.
Updated about 1 month ago